Infinity Day Community Activity Pack
SATURDAY, AUGUST 8, 2026
A set of activities that can be carried out in a community group or family setting, with young people or adults. Find PDF here.
Welcome to the Infinity Day 2026 Community Activity Pack!
This year, Infinity Day, Saturday, August 8, 2026, will be celebrated as part of a yearlong initiative by the Science, Society & Culture division at the Simons Foundation called Infinite Sums. The initiative invites people across the country to reconnect with math in joyful, creative and meaningful ways. At the heart of this effort is community — people coming together to explore how math shows up in everyday life, everywhere from the rhythms of music to the spirals in nature, from storytelling to movement.
Whether you are a librarian, educator, caregiver, local business owner or simply a curious community member, this activity pack was created to help you lead engaging and inclusive Infinity Day celebrations. You do not need to be a “math person” to participate. Just bring your curiosity and see where the experience takes you.
Each activity in this pack offers a unique window into the idea of infinite sums: the endless adding up of small parts that come together to create something bigger, richer, and more complex. These activities highlight how simple steps, whether they involve numbers, shapes, words or actions, can reveal patterns and connections that go beyond what we can immediately see.
The activities are designed to be flexible, playful and accessible. They invite people of all ages, interests, and backgrounds to explore math in ways that are fun and meaningful. They can be used in libraries, community centers, classrooms, festivals or even at home, and they work well for groups of any size, including individuals exploring on their own.
We encourage you to connect these activities to what matters in your community. That could include local culture, lived experiences or personal passions. As you celebrate, feel free to share your Infinity Day moments, creations and discoveries on social media using #InfiniteSums.
Let’s celebrate together and discover the beauty and wonder of infinite sums in the world around us.
Why Infinity?
Imagine a race between Achilles — the fastest runner alive, known across the world for outrunning any challenger — and a slow tortoise who has been given a small head start. At first, Achilles reaches where the tortoise began, but by then, the tortoise has moved a little further ahead. Achilles tries again to catch up, but the tortoise has moved further still. This continues endlessly, with Achilles always chasing but never quite catching the tortoise. This puzzle, known as Zeno’s paradox, challenges our understanding of motion and infinity by showing how something infinite can hide in everyday things.
Writers and thinkers through the ages have struggled to understand what infinity really means. James Joyce, for example, asked readers to imagine a mountain of sand stretching a million miles in every direction. Now imagine a tiny bird carrying away one grain of sand every million years. Even after billions of years, the mountain would barely be touched. Yet even after the mountain is finally removed, “not one single instant of eternity could be said to have ended,” Joyce wrote.
Infinity is vast beyond imagining, yet in mathematics, it is also orderly and, in some respects, surprisingly simple. Despite its endlessness, infinity comes packaged with rules and limits that help us work with it. It is not simply a really big number. Infinity is a delicate idea, a set of names and concepts that helps us describe something endless but in ways we can still understand.
Georg Cantor, a pioneer in the study of infinity, showed us that there are different sizes of infinity. He believed that the infinity of the number of irrational numbers (such as pi and the square root of 2, which is approximately 1.41421… going on infinitely without repeating decimal digits) was larger than the infinity of the number of whole numbers (1, 2, 3, etc.), a problem known as the continuum hypothesis. Cantor struggled for years to prove this idea, and the harsh criticism he faced eventually led to a personal crisis. Even someone who devoted their life to studying infinity found it baffling and hard to fully grasp. So if infinity feels confusing or overwhelming at times, that is completely normal. You do not need to be a mathematician to explore these ideas; anyone can grapple with infinity. Take your time and enjoy the mystery.
Infinity Day invites us to explore these ideas with curiosity and creativity. This year’s theme, Infinite Sums, celebrates how many small pieces can add up to something vast and surprising, like grains of sand forming a beach or notes joining to make a song. Even sums that stretch on without end can carry meaning and uncover unexpected patterns when we take the time to look closely. Infinity Day gives us a moment to slow down, sit with the unknowable and explore the beauty of ideas that stretch beyond limits.
Start Here: Bringing Infinity Day (and Math) to Life
Math can feel intimidating and, for many, just seeing numbers sparks stress or anxiety. That feeling is real, but so is the potential for change. Math confidence grows in spaces where curiosity is welcomed, questions are encouraged, and mistakes are part of the journey. Whether you’re hosting an Infinity Day celebration, leading a group or gathering friends and family, this guide is here to help you create that kind of playful, welcoming environment.
Infinity Day is a perfect opportunity to make math feel alive, relevant and joyful. It’s a chance to explore math beyond the classroom walls through stories, creative problem-solving and community connections. From baking to architecture, farming to design, math shows up everywhere. By inviting others to share their experiences, you help reveal the many ways math shapes our world.
Use this guide as a starting point, not a script. Adapt it freely to fit your group’s age, background and interests. Whether you’re planning hands-on activities, hosting a guest speaker, or encouraging informal conversations, your energy and curiosity will set the tone.
A few tips for getting started:
- – Test it out. Try the activities yourself first so you see how they flow, have examples to share, and get a sense of how much time folks might need.
- – Keep it playful. Math comes alive through movement, storytelling, creativity and shared experiences.
- – Celebrate questions. Wondering “why?” or “what if?” is exactly the point.
- – Be flexible. You don’t need to follow every step or complete every activity; go where the energy leads!
- – Highlight real voices. Invite speakers or volunteers to share how math appears in their work or daily lives, and make room for diverse perspectives.
- – Engage, don’t perform. Focus on participation and discovery, not on being right or mastering content.
- – Stay curious. You don’t need all the answers. Explore and learn together.
- – Take your time. If one idea sparks joy or deep interest, stay with it. That’s meaningful learning.
- – Use pi as a doorway. It’s okay if people leave with more questions than answers.
Above all, make it your own!
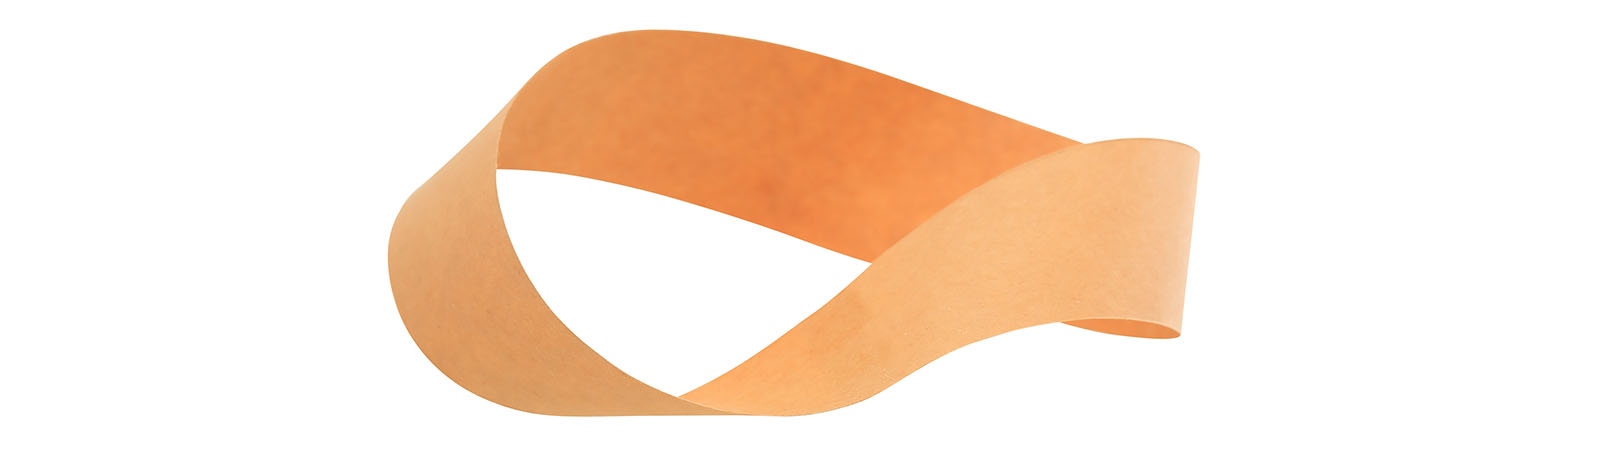
Activity 1: Möbius Strip Explorer
Exploration Goal:
Participants will discover how a simple twist can create a loop that seems infinite. Through building and cutting Möbius strips, they’ll explore one-sided surfaces and the world of topology in a playful, hands-on way!
Overview:
What if a shape had just one side … and one edge?
The Möbius strip is a loop with a twist that breaks our everyday expectations of geometry. In this activity, participants build, cut and investigate Möbius strips to explore how a small change (a twist) creates something surprisingly infinite. It’s a powerful and low-barrier way to connect with the concept of infinity through physical space. Perfect for curious minds of all ages, it’s hands-on, visual and fun.

Math Concepts:
one-sided surfaces, topological transformation, surface continuity
Time:
20-30 minutes
Materials:
Prepare Ahead:
- – Optional: sample Möbius strip (page 9)
- Paper strips (1 inch wide, 10–12 inches long)
What You’ll Need:
- – Tape or glue
- – Scissors
- – Markers or pens, at least two colors
- – Rulers (optional)
Watch out! Adult supervision is required if young children are using scissors.
Instructions (Step-by-Step):
1. Prepare paper strips. Cut a sheet of letter paper into six pieces along its length. This will produce six roughly 1.4-inch by 11.5-inch strips. Repeat for twice as many participants as you expect.
2. The fundamental question. Most shapes we encounter have multiple sides and multiple edges. Hand out two strips of paper to each participant as you introduce the activity. Hold up one of the strips of paper:
- –“How many sides does this have?” Two! Sides are the flat surfaces of a shape, parts you can color in.
- –“How many edges does this have?” Four straight line segments!
- -Then pose the mystery: “What if we could make a surface with just one side and one edge?”
3. Make the control loop. Have them color their rectangle strip one side COLOR 1, one side COLOR 2. Everyone makes a normal loop (no twist) with their first strip. Tape it together.
- Count on the loop: two sides, two edges (marked as orange and blue)

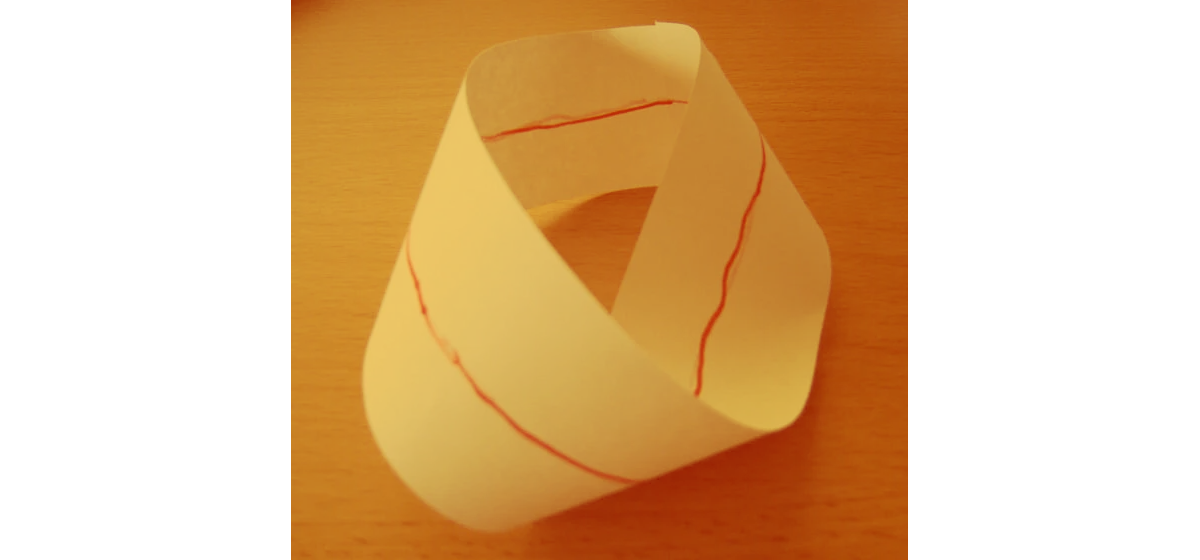
4. Create the Möbius strip. Take a new strip. Before taping, give one end exactly a half-twist (180 degree). Tape the ends together.

5. The one-side discovery. Start drawing a line along the middle of the Möbius strip, keep drawing without lifting the marker or crossing an edge. You end up back where you started, having made a line across the “entire” surface. “Did you ever have to lift up your pen? Did you come back to where you started without switching sides?” Run your finger along the edge. There’s only one continuous edge!
- Encourage participants to experience the strange, continuous surface physically before experimenting further.
6. How special is our Möbius strip? We’ve established the special property of the Möbius strip (an object with no up or down side). Cutting is the next step to test if that uniqueness changes what happens. “We’ve seen that a Möbius strip has one side. But what happens if we cut it down the middle?”
- – Demonstrate to participants how a normal loop, when cut down the middle, becomes two loops. “If I cut a normal loop in half down the middle, what do I get?” Two separate loops.
- – “What happens if I cut the Möbius strip in half down the middle? Will it split in two? Will it stay as one?” Note everyone’s predictions!
7. Perform the cut. Hand out scissors so multiple participants can experience cutting their own Möbius strip, or demonstrate this to the group if more appropriate. Cut carefully along the line down the exact middle of the Möbius strip.
- It becomes one long loop, twice as long, still twisted! The Möbius strip is not like a normal loop — cutting it doesn’t produce two separate loops. “The strip has only one side, so when we cut it, the cut travels along the whole surface.”
8. Optional: exploring further . Cut the resulting long loop in half, now there are two linked loops. “Remember the loop we just cut and got one long strip? Let’s see what happens if we cut that strip down the middle again.”
Try making new Möbius strip variations with multiple twists. Encourage participants to explore what happens with different variations. “Now let’s get creative! Take a new strip and try giving it two twists, or even three twists, before taping the ends together. What happens when you draw along the middle of these different versions? What happens when we cut these Möbius strip variations in half?”
- – Zero twists (normal loop): cut → two separate loops
- – One twist (Möbius): cut → one loop, twice as long
- – Two twists: cut → two linked loops
- – Three twists: cut → creates a knot
Community Adaptations
Invite participants to write infinite messages or drawings on their strips — looping stories!
Getting Younger Children Involved
- – Help them tape the loops and add the twist.
- – Focus on the drawing step, let them trace the loop with a marker and see the surprise when the line connects back to itself.
- – Use bright colors and stickers to make the activity playful and hands-on.
Getting Teens Involved
- – Encourage them to experiment with cutting at different widths and adding extra twists.
Getting Adults Involved
- – Introduce the idea of topology and how the Möbius strip defies ordinary geometry. “Topology is the math of shapes you can stretch and squish without cutting.” Example: “To a topologist, a mug and a donut are the same shape — they both just have one hole!” Why does topology matter? It helps us understand everything from how DNA twists in our cells to how everyday objects and materials can be designed in clever new ways.
- – Use the activity as a conversation starter about infinity, continuity and transformation in mathematics and art.
Activity 2: Infinite Patterns Around Us
Exploaration Goal:
Participants will explore how simple rules repeated over and over create endless complexity in nature, geography and culture. They will see how fractals make infinity tangible while connecting math with art, science and the world around them.
Overview:
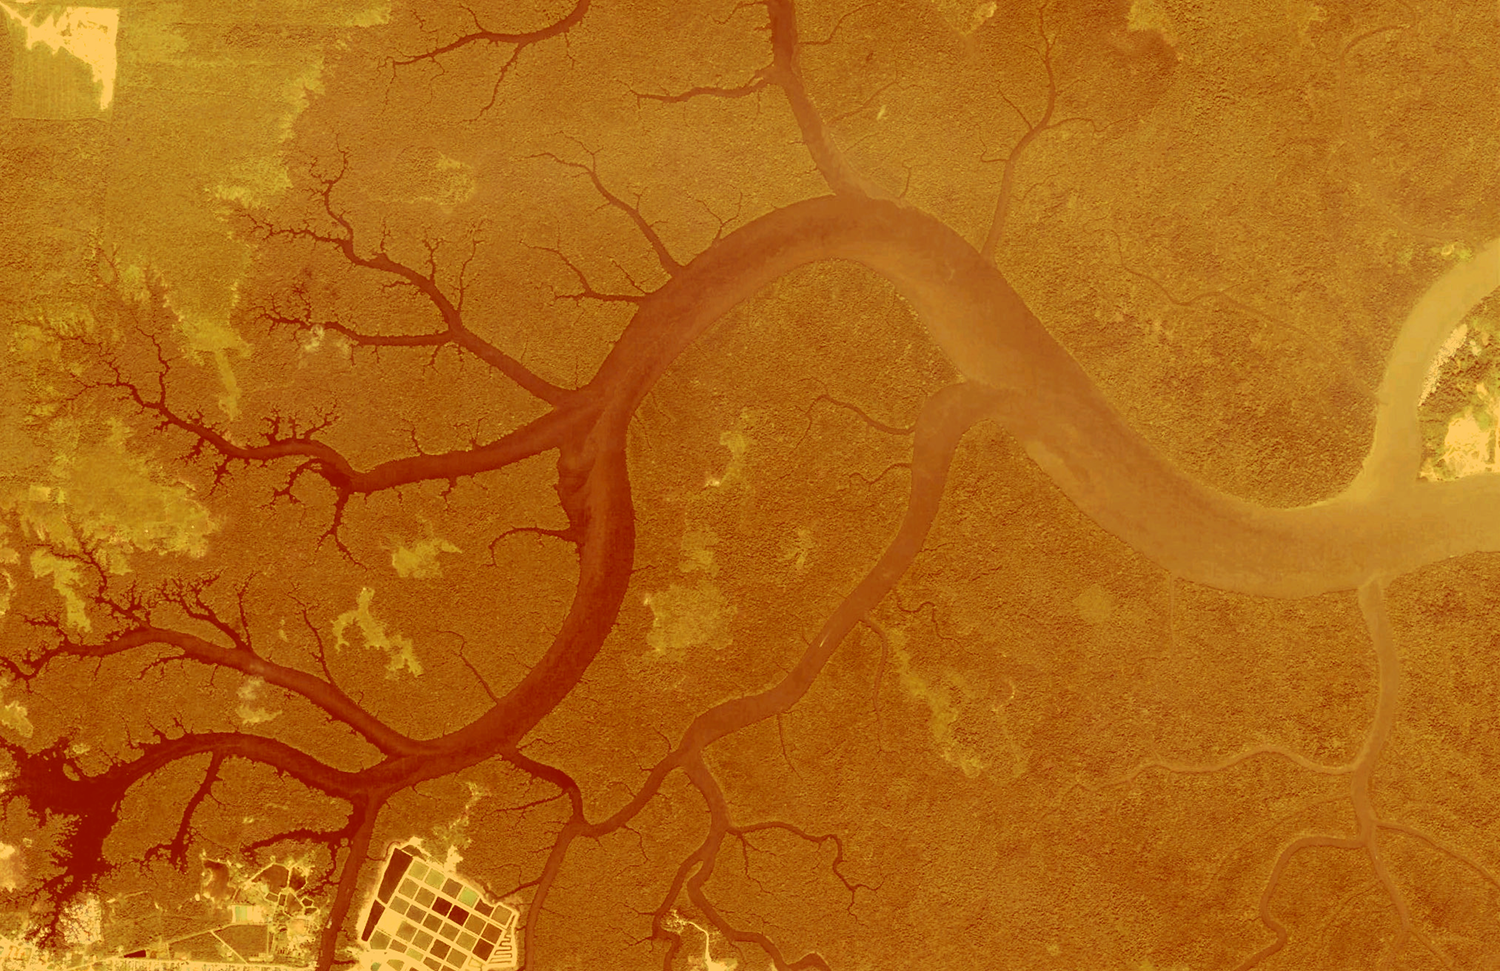
Fractals are everywhere, hiding in plain sight. They appear in nature, culture and art, from the delicate spirals of a fern to the jagged edges of a coastline, from the branching of rivers to the veins of leaves. Fractals are shapes that repeat themselves at different scales — zoom in or zoom out, and you see the same basic pattern again and again.
Take a river delta, for example: The main river splits into smaller streams, which in turn split into even smaller tributaries. Each smaller part is a scaled-down version of the larger structure. Fractals let us take something that seems chaotic and see an underlying pattern by understanding how the same rules repeat at smaller and smaller scales. Not only are fractals all across nature, but they also appear in human culture. Artists, architects and engineers have long been inspired by these repeating patterns, using them to create beauty, functionality and efficiency.
In this activity, participants will explore fractals hands-on, using simple, repeated rules to build fractals of their own. In this activity, participants use simple repeated rules to create fractals on paper, making the abstract idea of infinity tangible and visible. Fractals invite us to notice patterns in the world around us and discover connections between math, art, nature and culture.
Math Concepts:
iteration and recursion, scale and self-similarity, affine transformations, geometric construction, infinite processes within finite space
Time:
15–20 minutes
Materials:
Prepare Ahead:
- – Collect circular objects (e.g., plates, cans, poster tubes, paper towel tube, rolls of tape, bottle caps, etc.).
- – Printed maps, satellite images, natural forms (e.g., coastlines, leaf veins, mountains, etc.) (page 13-17)
What You’ll Need:
- – Large paper pad/poster board
- – Long rulers (for drawing straight lines)
- – Pens or markers (at least two colors)
Instructions (Step-by-Step):
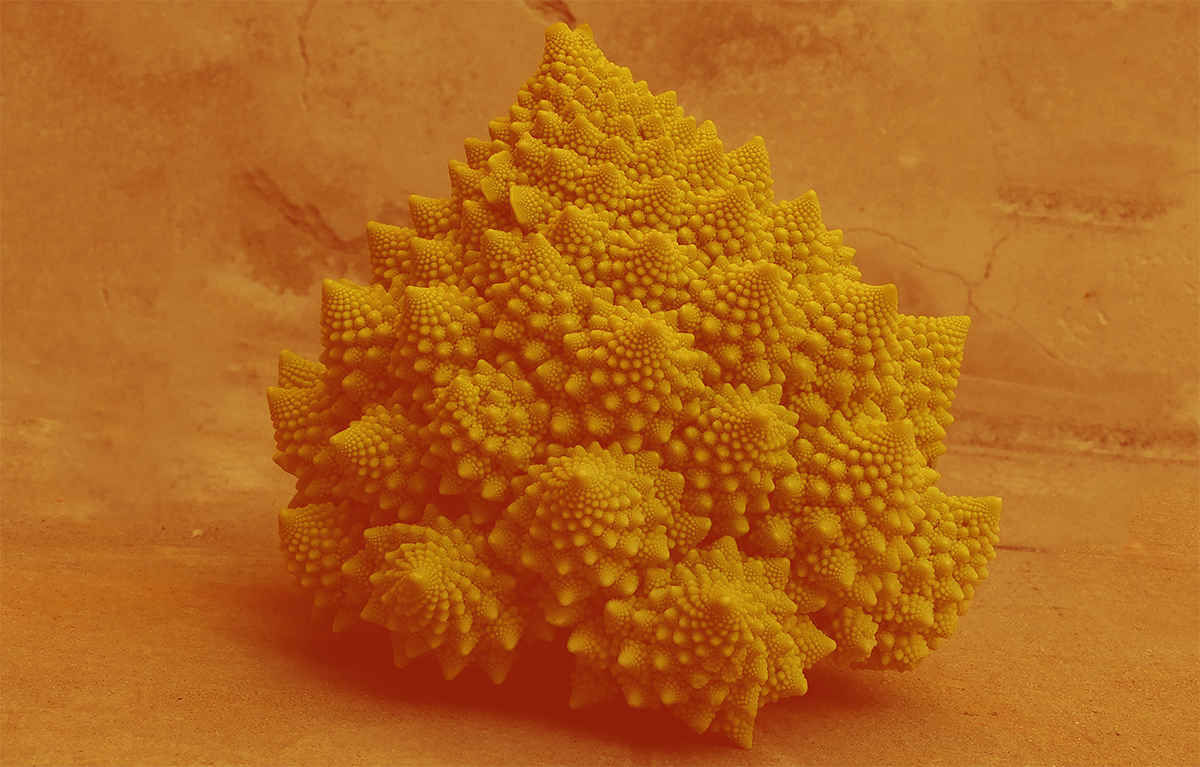
1. Explore fractals around us. Show images of natural fractals: River deltas, lightning, Baobab trees, Romanesco broccoli, snowflakes, and coral reefs. Briefly share: “Fractals are shapes that repeat themselves at smaller and smaller scales. A simple rule, applied over and over, creates endless complexity. Look around — you can see fractals everywhere, from trees to rivers to snowflakes.”

2. Choose a fractal type. “Pick a fractal to start. Don’t worry about perfection — focus on repeating the rule and watching the pattern grow.” As a group or individually, choose one of these starting points:
- – Sierpinski triangle: Start by drawing the largest possible triangle you can on your paper, then draw lines connecting the middles of each side. Repeat. Alternate colors for each round to help visualize.

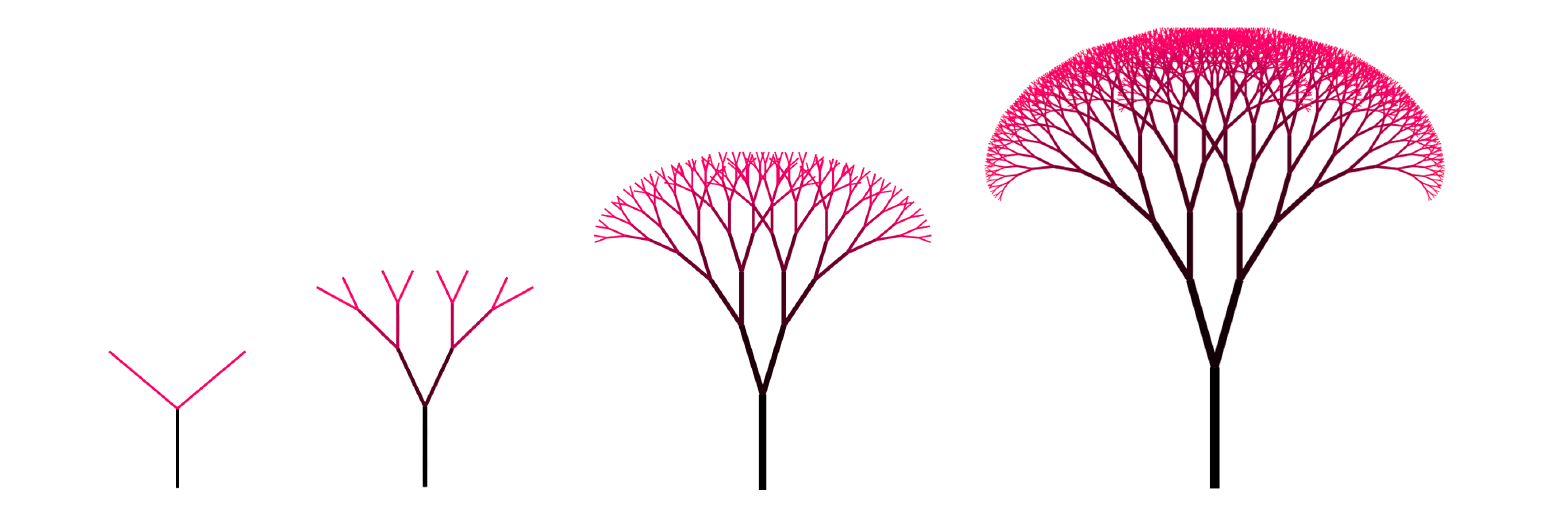
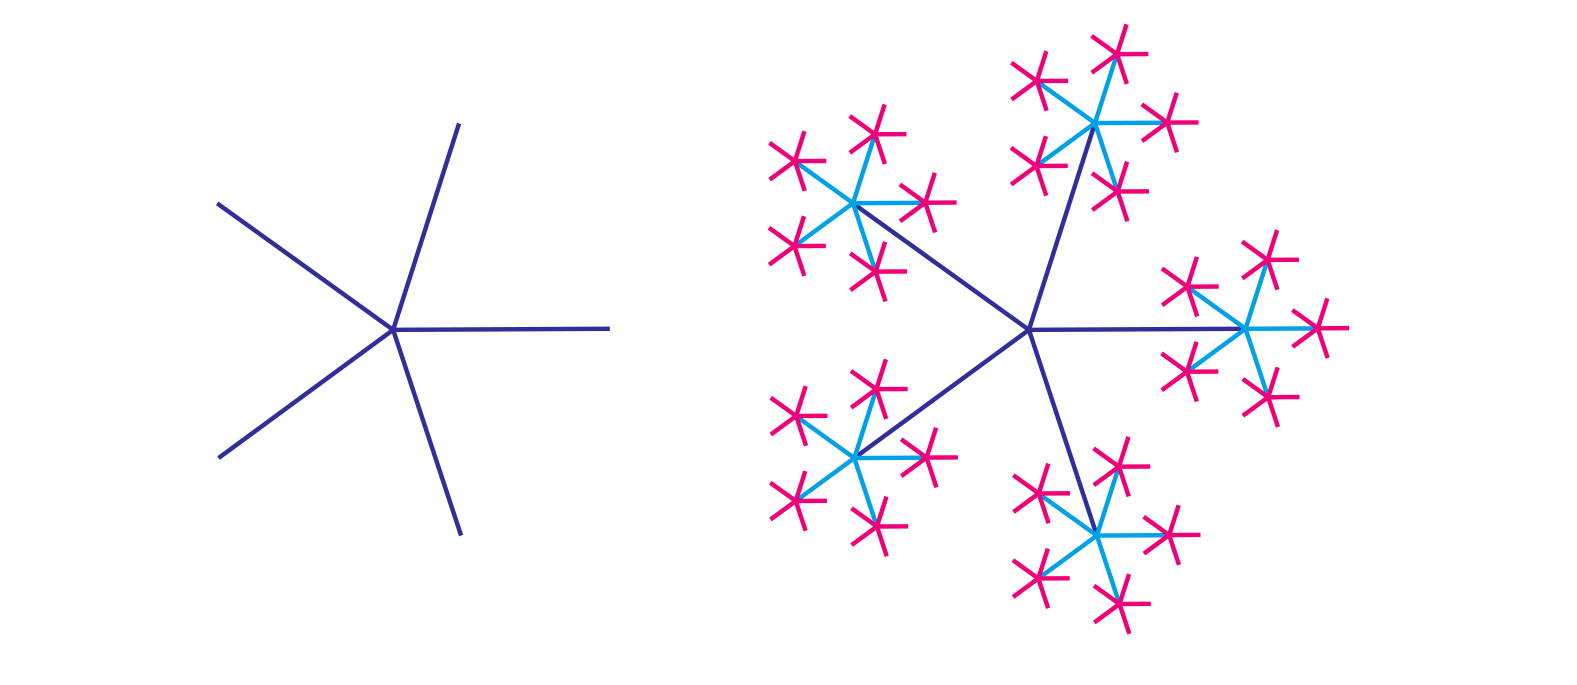
3. Build the fractal. On paper, repeat your chosen fractal rule 3–5 iterations. Emphasize how the shape grows without losing its pattern. Encourage experimentation: mix colors, label steps or add cultural or geographic notes (e.g., “My binary tree is based on the Baobab tree in Madagascar”).
- – “How does the shape change as you repeat the rule?” It very quickly becomes more detailed, intricate and complex while keeping the original pattern.
4. Present and reflect. Have participants who made different drawings share out with each other. Ask questions like:
- – “How did a simple rule create so much detail?” Repeating a simple rule at smaller scales produces complexity more and more quickly (exponential complexity).
- – “Where have you seen this kind of pattern in nature or culture?” Trees, rivers, snowflakes, art patterns, coastlines, lightning, pinecones, fern, etc.
- – “If you could keep iterating forever, what would happen?” The pattern would grow infinitely complex but still follow the same rule!
- – “Why are fractals useful in computer graphics?” They let designers create complex, realistic shapes with simple rules.
- – Highlight how complex beauty can arise from simple rules.
Community Adaptations
Highlight local ecosystems or geographical features such as snowflakes, coastlines, etc.
Getting Younger Children Involved
– Provide pre-drawn templates where they color or decorate each iteration.
– Connect fractals to familiar examples (e.g., snowflakes, trees or river shapes).
Getting Teens Involved
– Encourage personal or cultural connections (e.g., using local coastlines or cultural symbols).
– Include a reflection board on “infinity in the real world” (coastlines, networks, data). Coastlines are fractal because no matter how closely you zoom in, you see the same rough, jagged patterns repeating. That’s why measuring the length of a coastline is tricky — it depends on the scale you use!


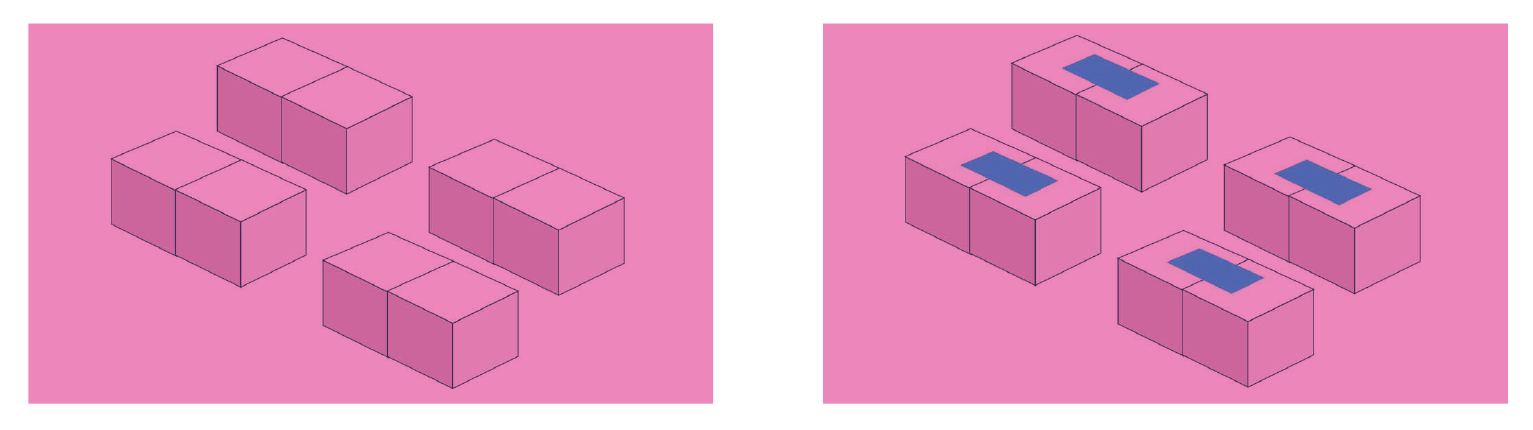
Activity 3: From Polygons to the Perfect Curve
Exploration Goal:
Participants will discover how flat panels can build up into a round ball. By constructing polyhedra (3D solids made of flat polygons) and comparing them to real spheres, they’ll explore how adding more and more pieces gets us closer to a perfect curve — an intuitive window into the infinite process of mathematical limits.
Overview:
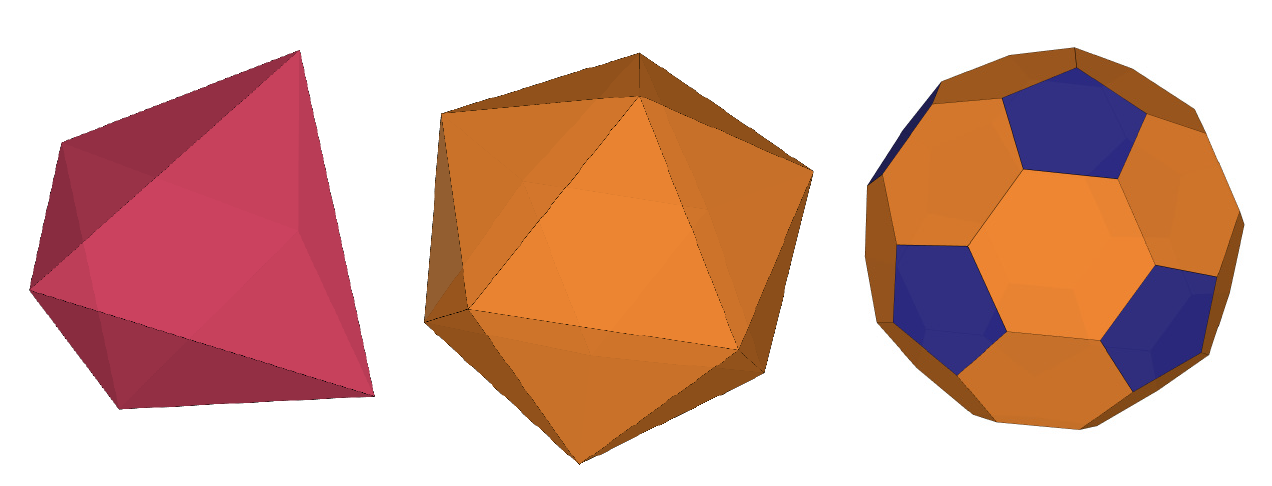
When is a ball not quite round? How do you make a ball from flat pieces? This hands-on geometric exploration uses soccer ball shapes (which are not perfect spheres!) to explore how a collection of flat faces can approach the perfect curve of a sphere. A classic soccer ball is a truncated icosahedron — that means it starts with an icosahedron (20 triangular faces), then each corner is chopped off (truncated), forming new faces, so you end with 12 pentagons and 20 hexagons patched together.
From icosahedrons to modern curved-panel designs, a soccer ball is constructed by panels that are flat — but together they make a nearly round ball. In this activity, participants build different polyhedra, compare them to a real ball, and discover how adding more and more sides gets us closer to the infinite idea of a sphere.
Inspired by the 2026 World Cup ball’s radical new design, this activity bridges sports, geometry and infinity, revealing how even the most familiar objects hide deep mathematical ideas.

Math Concepts:
polyhedra and platonic solids, geometric convergence, surface area approximation, topology and curved geometry, symmetry and tessellation
Time:
30–40 minutes
Materials:
Prepare Ahead:
– Optional: Printable paper construction tips (page 23)
– Printable template(s) of tetrahedron (4 faces) (page 25)
– Printable template(s) of octahedron (8 faces) (page 27)
– Printable template(s) of icosahedron (20 faces) (page 29)
– Printable template(s) of truncated icosahedron (32 panels — traditional soccer ball) (page 31)
– Reference images of different soccer balls (traditional and 2026) (page 45)
What You’ll Need:
– Scissors
– Glue
– Soccer ball
– Spheres (e.g., balls, balloons, oranges) for comparison
Watch out! Adult supervision is required if young children are using scissors.
Instructions (Step-by-Step):
1. Prepare polyhedron templates. Cut out the printable templates ahead of time so participants can jump straight into building. You can print one per person, or save prep by encouraging participants to work together — especially on the bigger, more complex shapes.
2. Introduce the activity. “Today, we’re going to be exploring the math of soccer balls! Before we dive into soccer balls, let’s start small. In math, a polyhedron is any solid shape made of flat polygon faces. Can you think of anything in the real world that looks like this?”
- – Allow participants to share. Some common examples include cubes (dice), prisms and pyramids

3. Start with a simple solid. Build a tetrahedron (four faces) using paper or card. Hold it next to a ball or sphere. “What do you notice about this shape?” Participants might say: It’s pointy. It has sharp angles. It doesn’t look very round. For Steps 3–5, you might invite groups to build the different shapes and then bring everyone back together to compare and discuss. You’re also welcome to use only a subset of the shapes if that works better for your session.
4. Add more faces. Now build an octahedron and/ or icosahedron. Notice how each new solid looks slightly more like a sphere, but it’s still faceted. Talk about how the surface is “getting smoother” even though each face is still flat. “Even though every face is still flat, why does the whole shape start to look more round?”
- Using both pentagons and hexagons fills in the corners, smoothing the surface.
- The corners are more spread out, so nothing sticks out as sharply, making it feel more like a real ball.
- Cutting off corners (truncation) helps flatfaced solids look more like a sphere.
5. Construct a classic soccer ball. Use a template to build a truncated icosahedron: 20 hexagons plus 12 pentagons. This is the traditional blackand-white soccer ball design. Compare its symmetry and curve to the previous shapes and to an actual ball.
- – Tip: The printable template includes both a small version (using one sheet of paper) and a larger version (using six sheets of paper). Encourage participants to team up for the larger build — it makes an almost life-sized ball!
6. Introducing the 2026 Trionda ball. Show images of the new 2026 World Cup ball, designed with just four curved panels. Ask questions like: “Why did designers choose fewer panels? What happens when we use curved faces instead of flat ones?”
- – Fewer panels = less stitching, so the ball is more aerodynamic.
- – Curved panels allow the ball to be smoother even with fewer pieces. Curving faces is another way to approximate a sphere, similar to increasing the number of flat faces.
- This introduces the concept of a mathematical limit in an intuitive, visual way: The ideal shape (a perfect sphere) is approached but never truly reached with flat faces.
7. Explore the limit. Ask: “What would happen if we kept increasing the number of faces forever? Or if we curved each face just a little more?” Eventually, we’d get closer and closer to a true sphere, an infinite surface made of infinitely small panels.
Community Adaptations
Invite a local soccer coach or player to reflect on how the feel of the ball matters.
Getting Younger Children Involved
– Provide pre-built tetrahedra and soccer-ball (truncated icosahedron) models for hands-on exploration.
– Let kids touch, roll and compare the shapes to see how round or bumpy they are.
– Let kids decorate each shape with colors or stickers to “see the faces.”
Getting Teens Involved
– Have teens construct multiple solids (tetrahedron, octahedron, icosahedron, truncated icosahedron).
– Talk about real-world connections: why engineers and designers use panels and curves to approximate spheres (e.g., sports balls, domes, lenses and spacecraft components). Flat panels are easier to manufacture than perfect curves.
Getting Adults Involved
– Consider the 2026 World Cup ball design changes and why. Perhaps it is to improve performance (flight, bounce, control), incorporate new technology (materials, paneling, coatings), respond to player feedback and give each tournament a unique identity.
– Explore how geometric patterns and polyhedral approximations appear in art, architecture and design worldwide (e.g., geodesic domes, mosaics and sculptures, etc.)
– Compare soccer ball designs with basketball designs! Soccer balls are stitched from flat panels to create a round shape — a design that adds durability, improves foot control, and has remained iconic and functional over time. Basketballs, invented roughly 40 years later, are molded from rubber or synthetic materials into near-perfect spheres, so they don’t need panels. Their lines are actually shallow grooves that provide grip, made by bonding an outer cover around the inner air-filled ball.
Activity 4: Infinity in Motion
Exploration Goal:
Participants will explore how simple shapes can combine into a structure that folds and flips endlessly. Through hands-on building, they’ll experience the playful magic of “infinity” in a tangible, interactive way.
Overview:
Some patterns go on forever. Some shapes repeat endlessly. Infinity can be hard to imagine — it’s bigger than any number we could dream up. But sometimes, simple finite systems can create the experience of infinity. Could we hold infinity in our hands? The infinity cube is a modular toy made from small cubes that fold into each other in an endless loop. It has only eight cubes, but the way they are connected makes the motion loop back on itself forever. As you flip, fold and rotate it, one face becomes another without ever stopping. This activity explores how motion, structure and clever design can create the illusion of neverending movement. Decorating each face or adding repeating patterns allows participants to see how design, symmetry and creativity all contribute to the “never-ending” effect.
Infinity shows up all around us. Fern leaves, Romanesco broccoli and river networks repeat their shapes over and over. Spirals appear in galaxies, seashells and sunflower seeds. Waves and the day-night cycle keep going without stopping. Even trees, lightning and blood vessels branch again and again, creating patterns that could continue forever. The Infinity Cube turns simple shapes into a playful exploration of motion, geometry and imagination — perfect for all ages and accessible to anyone.

Math Concepts:
modular 3D construction, hinged motion and symmetry, infinity through repetition, geometric reasoning
Time:
25–40 minutes
Materials:
Prepare Ahead:
– Optional: Printable paper construction tips (page 53)
– For each infinity cube: 8 small cubes of equal size (optional: prepare origami paper cubes by pre-cutting them, page 55)
– Completed pre-built infinity cube to show as an example
– Optional: Printable large paper cube templates (pages 57-67)
What You’ll Need:
– Masking tape, painter’s tape or clear tape (no wider than your cubes)
– Markers or stickers for decoration
– Scissors
Watch out! Adult supervision is required if young children are using scissors.
Instructions (Step-by-Step):
1. Prepare the cube building blocks and practice assembling the cube. Fold eight paper cubes of the same size, or set aside eight wooden craft cubes. This will make one infinity cube. Repeat for as many infinity cubes you would like your participants to make. Follow the instructions in step 2 to make your sample infinity cube.
2. Assemble the cube. You’ll now join the eight small cubes into one larger cube that can fold and flip. Use tape to create “hinges” between the cubes so they move smoothly.
Facilitator tip: Have a sample one pre-made as an example. Make another infinity cube with the participants as a live visual guide.
i. Make four pairs of cubes: Place the cubes side by side in pairs. Use a piece of tape across the top to connect each pair. Make sure the tape is securely fastened, but still loose enough to act like a hinge — the cubes should open and close like a book.
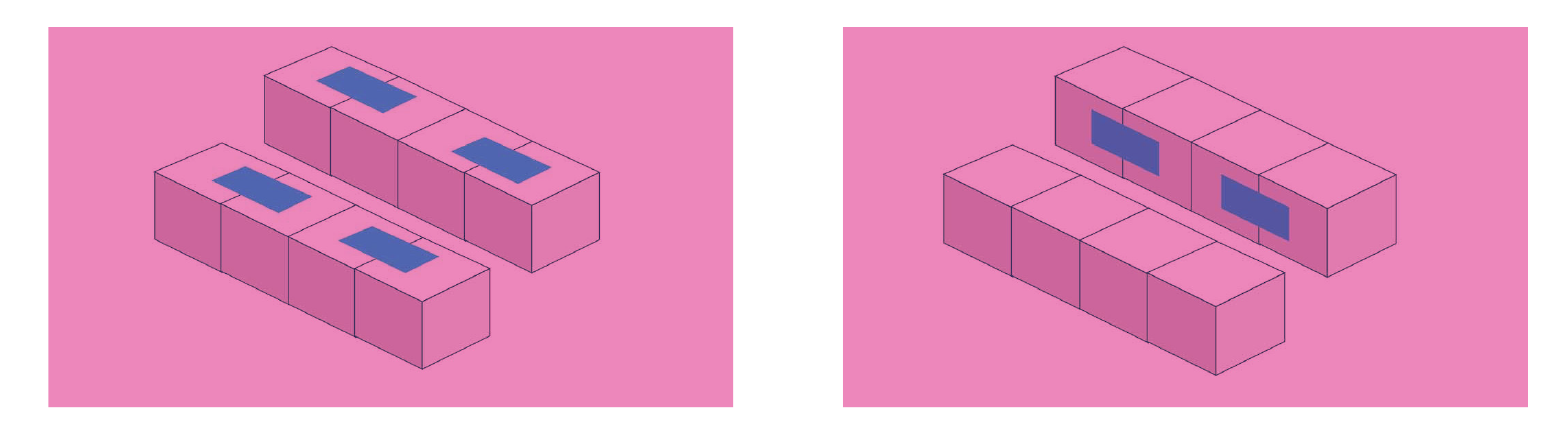
ii. Form two rows of four cubes: Push two pairs together to make one row of four cubes. Repeat with the other four pairs to make the second row.
iii. Rotate the rows inward: Turn each row 90 degrees so they “face” each other. The taped tops should now be on the inside, facing each other.
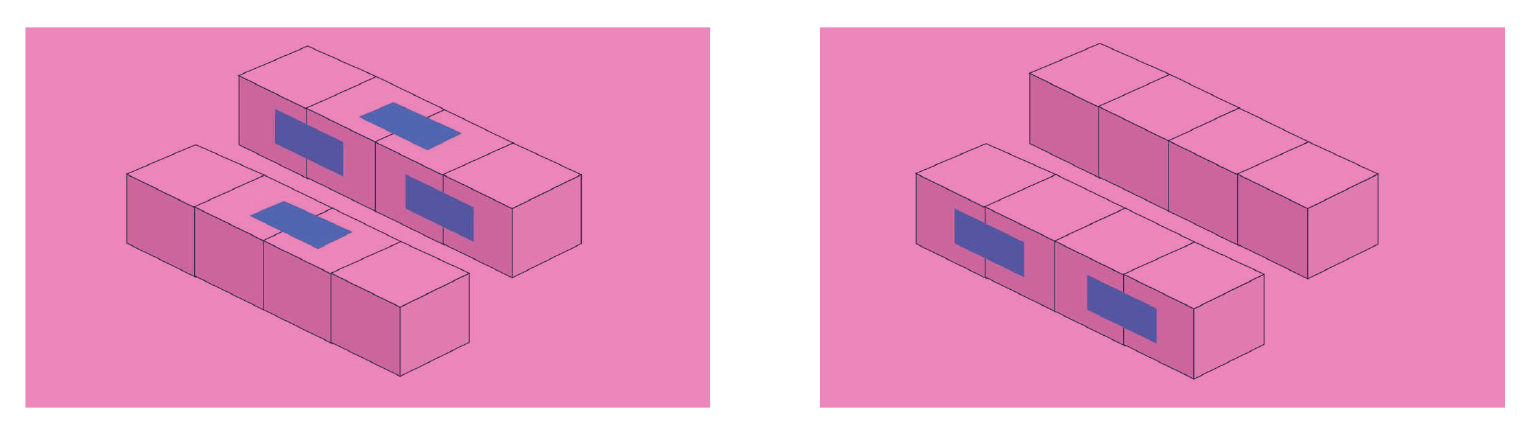
iv. Hinge the center cubes: In each row of four cubes, tape across the top of the middle pair to join them with a hinge.
v. Now rotate the rows outward: Flip each row 180 degrees so the initial taped tops now face outward. The tape you just added to the middle pairs will now be on the bottom.
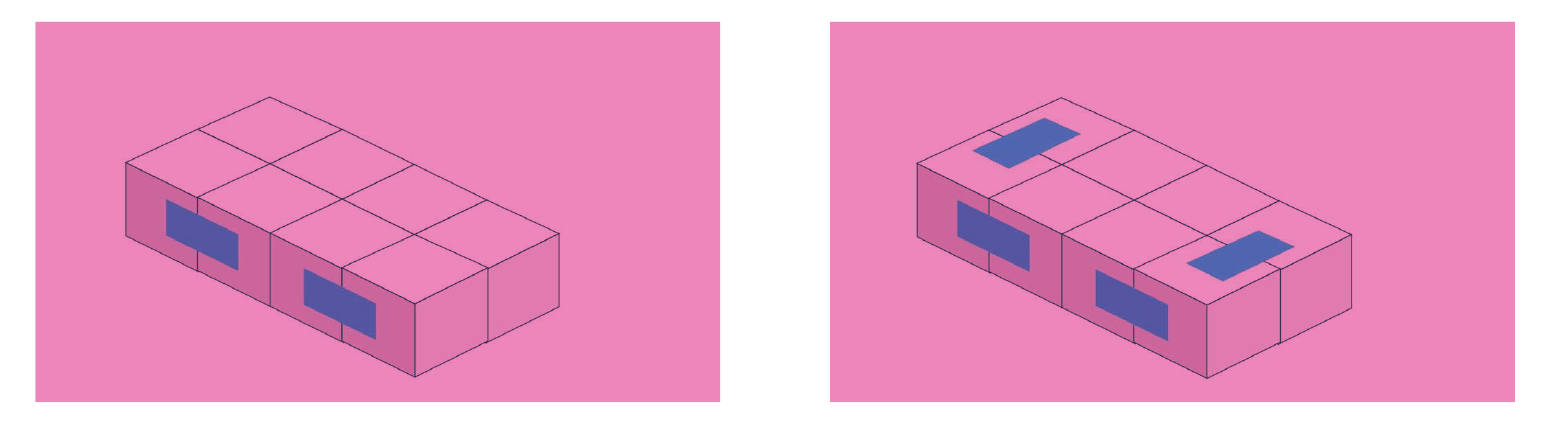
vi. Combine into a block: Push the two rows together so you now have a solid block of eight cubes.
vii. Tape the ends: Add tape to the short ends of the block to connect the end cubes. Again, make sure the tape works like a hinge, not too tight!
viii. Test it! Gently fold and flip the block. If done correctly, the cube should open, fold, and keep going endlessly.
3. Explore the movement. Fold the cube open and closed. Flip it around. Keep going. It never ends!
4. Reflect on infinity. “Why does this feel endless?” “What makes the motion smooth and uninterrupted?” “Can you think of other finite things that act infinite?”
- Examples of finite things (things that are countable, limited in time or space, or constrained by circumstances) acting infinite:
- 1. Geometry: A circle has no beginning or end, even though it’s just a simple closed shape.
- 2. Time: A clock hand cycles every 12 hours, endlessly repeating.
- 3. Music: Songs can loop on repeat, turning something finite into something that feels endless.
- 4. Math: Repeating decimals (like 0.333…) go on forever, even though they come from a simple fraction.
- 5. Nature: Ocean waves or river ripples keep flowing smoothly, creating a sense of endless motion.
5. Decorate and extend. Participants can decorate each face with repeating patterns, numbers or artwork that emphasize the endless motion.
Community Adaptations
You can prepare several infinity cubes in advance for participants to explore (instead of building the infinity cube), focusing on guiding discussion as they play.
Collaboratively make large-scale infinity cubes! Prepare eight equal-sized cubes using the larger cube template (pages 57-67) as in step 1. (16 sheets of paper needed in 3 different colors; 3 colors x 2 letter papers needed per color for each cube x 8 cubes)
Getting Younger Children Involved
– Use bright colors or stickers to decorate each face with simple shapes or smiley faces.
– Focus on the “endless flipping” as a fun, magical toy rather than the math.
Getting Teens and Adults Involved
– Use the activity to spark conversation about real-world engineering: hinges, mechanical linkages and product design.
PAPER CONSTRUCTION TIPS
Cutting:
– Cut all outer lines only
Folding:
– All other solid lines
– Make all folds before attaching
Attaching:
– Spread a thin layer of glue on the tabs. A wooden toothpick can be very useful for spreading the glue.
Activity 5: Tessellation Art
Exploration Goal:
Participants will discover how a single shape can generate a pattern that extends infinitely. By designing and repeating their own tile, they’ll see how finite pieces create endless designs, introducing them to the mathematical concept of tessellation through hands-on art-making.
Overview
Some patterns stop. Others go on forever. In this creative art-meets-math activity, participants design their own tessellating tile — a shape that fits with itself perfectly in every direction. When copied and repeated, these tiles create a looping, infinite pattern with no gaps or overlaps, much like what you see in the artwork of M.C. Escher or in traditional tiling from around the world.
Tessellations are more than decoration; they’re a way of exploring how something finite (one shape) can generate something infinite (a plane-filling pattern). Tessellations show how shapes can fit together perfectly without gaps or overlaps — and are the basis for things like tiling floors, designing patterns and studying repeating structures. This activity blends creativity with geometry, allowing participants to experience mathematical infinity through art.
Math Concepts:
symmetry and geometric transformations (how shapes can be translated, rotated or reflected), repetition and infinite extension, spatial visualization
Time:
20–30 minutes
Materials:
Prepare Ahead:
– Example tessellating tile (steps 1–2)
– Squares of cardstock for creating tessellating tiles
What You’ll Need:
– Blank paper for making tiling pattern (letter-sized or larger)
– Scissors for cutting out tessellating tile
– Tape
– Pencil
– Calculators
– Colored pencils, crayons or markers for decorating
Watch out! Adult supervision is required if young children are using scissors.

Instructions (Step-by-Step):
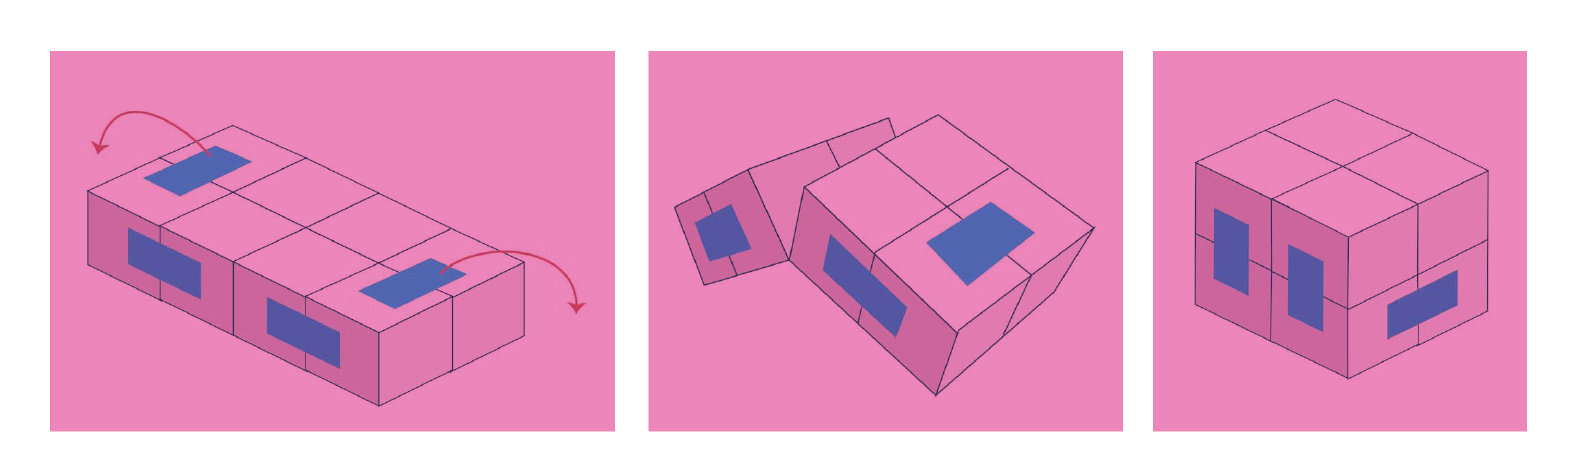
1. Create a base tile. Start with a small square piece of cardstock or other heavyweight paper (2–5 inches is a good size). Label the top, bottom, left and right sides lightly in pencil.
2. Cut and shift. Draw a shape on the bottom of the square. Once it is drawn, cut it out and then slide the piece upwards toward the top edge of the paper. Tape the cut piece in place. This preserves the ability to tile without gaps.
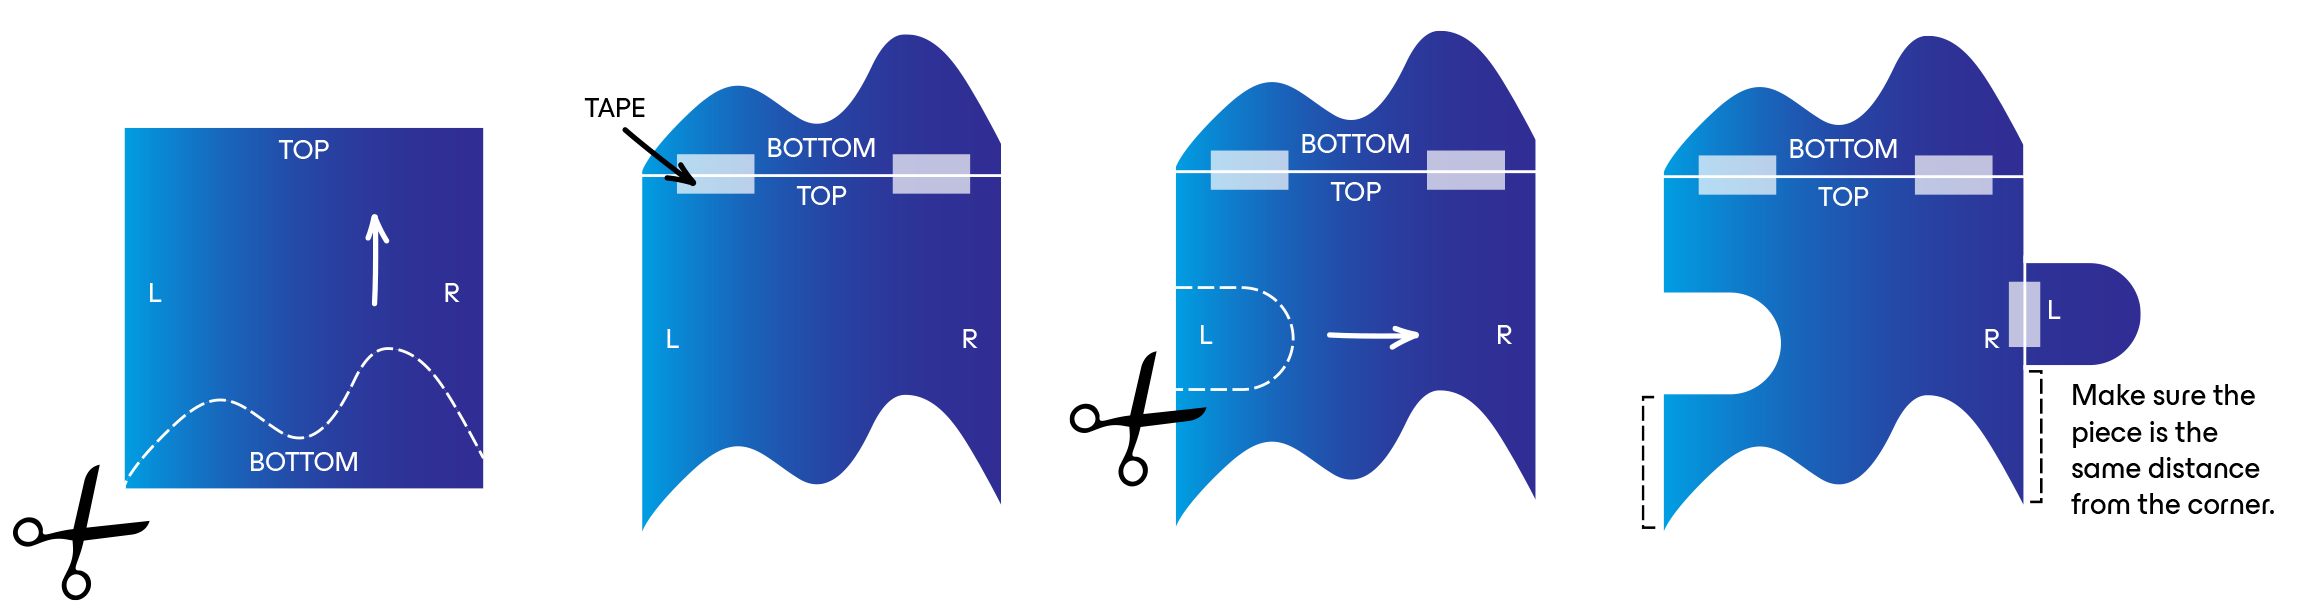
Optional: Repeat for the other pair of sides (left/right). Cut out a shape out of the left side, slide that shape directly to the opposite side and tape it in place.
Facilitator tip: If a cut goes from edge to edge, it will tile automatically (like in the bottomto-top example). If not, make sure that when you move the cut shape to the opposite side (like in left-to-right example), it stays the same distance from the corner as it was originally.
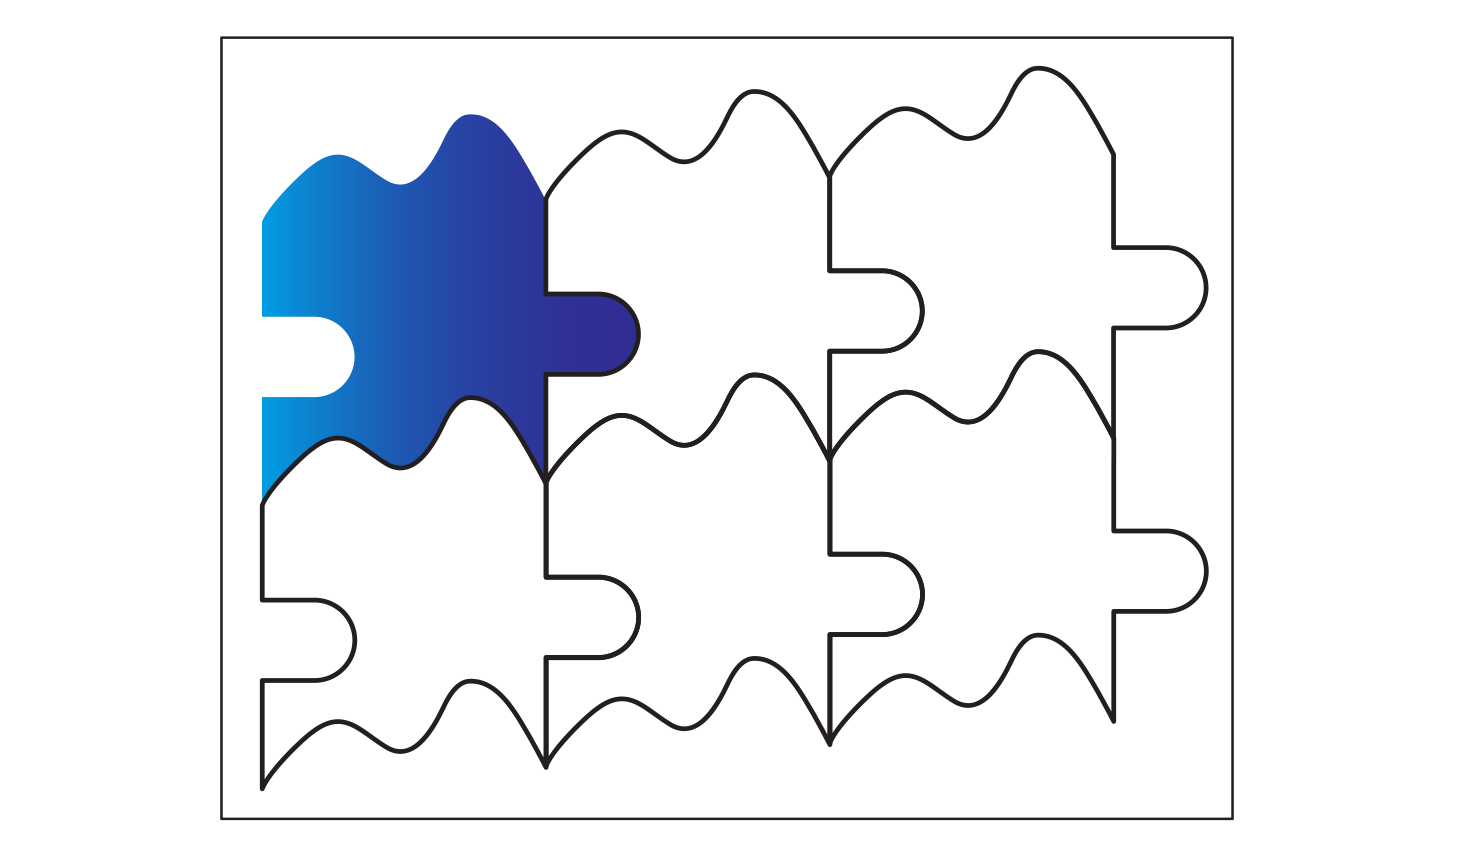
3. Make tessellations. Trace your custom tile onto a blank sheet of paper. Once you’ve traced it once, slide the stencil over until it fits like a puzzle piece. Continue several times, placing each copy edge-to-edge. Watch the infinite pattern begin to emerge.
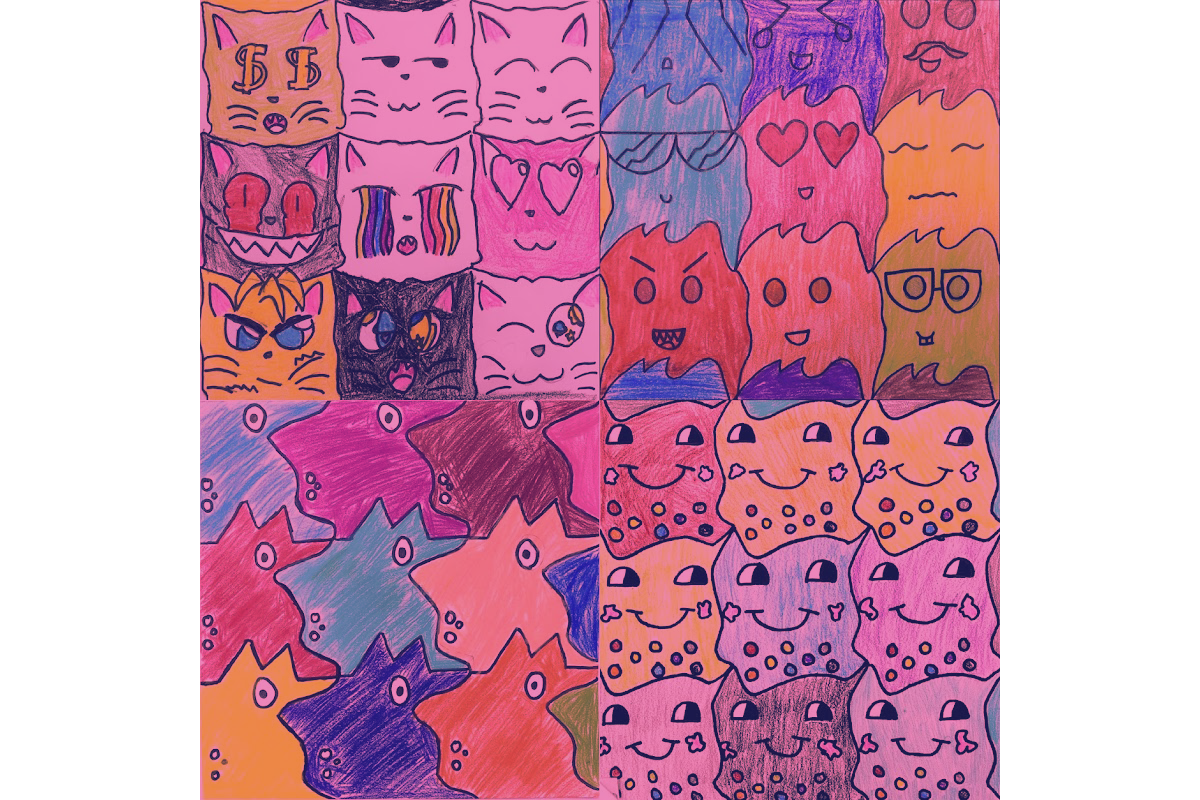
4. Decorate your tessellation. Encourage participants to color their tiles in, decorate them, or even see if they can see something that they could make their shape into!
5. Reflect and share. Invite participants to share their tessellations and explore each other’s designs! You can encourage participants to point out repeating shapes, symmetry, or clever edge-matching in each other’s work. “How does it feel to create a pattern that could go on forever?” “What surprises came up during the tiling?” “Where do we see tessellations in the real world?”
Nature and humans both rely on tessellations to solve practical problems with elegance. Examples of tessellations in the real world:
– Honeycombs: Hexagonal cells fit perfectly, giving bees efficient storage and strong structure.
– Pineapple skin: Hexagon patterns make the fruit strong and durable as it grows.
– Fish scales: Overlapping scales protect the fish, help it swim smoothly, and regulate temperature.
– Mosaics and modern architecture: Small pieces of glass or stone arranged in repeating patterns decorate walls, floors and ceilings. Architects and engineers use tessellating patterns in buildings, bridges and materials to combine strength and beauty.
Community Adaptations
Invite local artists or cultural groups to demonstrate tessellation traditions from around the world.
Getting Younger Children Involved
– Provide pre-made tessellation tiles and let them focus on bold, simple decorations like animals, shapes or cartoon faces.
– Encourage playful tiling: assemble a few copies together and watch their excitement as the pattern grows.
Getting Teens Involved
– Challenge them to include symmetry or repeating motifs, such as fractal-like details or geometric borders.
– Connect the activity to real-world examples like Escher’s art or Islamic tiling for cultural and mathematical context.
Getting Adults Involved
– Introduce the concept of geometric transformations (translation, rotation, reflection that underlie tessellations.