Pi Day Community Activity Pack
SATURDAY, MARCH 14, 2026
A set of activities that can be carried out in a community group or family setting, with young people or adults. Find PDF here.
Welcome to the Pi Day 2026 Community Activity Pack!
This year, Pi Day, Saturday, March 14, 2026, will be celebrated as part of a yearlong initiative by the Science, Society & Culture division at the Simons Foundation called Infinite Sums. The initiative invites people across the country to reconnect with math in joyful, creative and meaningful ways. At the heart of this effort is community, people coming together to explore how math shows up in everyday life, from the rhythms of music to the spirals in nature, from storytelling to movement and more.
Whether you are a librarian, educator, caregiver, local business owner or simply a curious community member, this activity pack was created to help you lead engaging and inclusive Pi Day celebrations. You do not need to be a “math person” to participate. Just bring your curiosity and see where the experience takes you.
Each activity in this pack offers a unique window into the idea of infinite sums: the endless adding up of small parts that come together to create something bigger, richer and more complex. These activities highlight how simple steps, whether they involve numbers, shapes, words or actions, can reveal patterns and connections that go beyond what we can immediately see.
The activities are designed to be flexible, playful and accessible. They invite people of all ages, interests and backgrounds to explore math in ways that are fun and meaningful. They can be used in libraries, community centers, classrooms, festivals or even at home, and they work well for groups of any size, including individuals exploring on their own.
We encourage you to connect these activities to what matters in your community. That could include local culture, lived experiences or personal passions. As you celebrate, feel free to share your Pi Day moments, creations and discoveries on social media using #InfiniteSums.
Let’s celebrate together and discover the beauty and wonder of infinite sums in the world around us.
Why Pi?
Every year on March 14, or 3/14, people around the world celebrate Pi Day. That date matches the first three digits of pi, 3.14. Pi is a mathematical constant that shows up anytime you measure a circle. It’s also Albert Einstein’s birthday, which adds a little extra fun to the celebration!
But pi isn’t just about numbers. Once you start paying attention, you’ll see it everywhere. It shows up in the curves of a coffee cup, the rings of a tree, the design of buildings, and the paths of planets. Artists, engineers, scientists and storytellers have all found ways to use pi in their work. It helps us explore shapes, patterns and the way the world fits together.
Pi Day is a chance to slow down and notice the circles, spirals and cycles that surround us. It’s an invitation to see how math connects to nature, to creativity, and to the way we move through space and time.
This activity pack is full of ways to explore those ideas. Inside, you’ll find activities that involve hands-on making, creative play, storytelling and thoughtful conversation. Whether you’re planning a public event or just gathering a few friends around a table, these activities are designed to spark curiosity and invite discovery.
Math isn’t only about formulas or right answers. It’s about wonder, patterns and finding connections in places you didn’t expect. Pi Day is a great time to celebrate all of that together.
Start Here: Bringing Pi Day (and Math) to Life
Math can feel intimidating and, for many, just seeing numbers sparks stress or anxiety. That feeling is real, but so is the potential for change. Math confidence grows in spaces where curiosity is welcomed, questions are encouraged, and mistakes are part of the journey. Whether you’re hosting a Pi Day celebration, leading a group, or gathering friends and family, this guide is here to help you create that kind of playful, welcoming environment.
Pi Day is a perfect opportunity to make math feel alive, relevant and joyful. It’s a chance to explore math beyond the classroom walls through stories, creative problem-solving and community connections. From baking to architecture, farming to design, math shows up everywhere. By inviting others to share their experiences, you help reveal the many ways math shapes our world.
Use this guide as a starting point, not a script. Adapt it freely to fit your group’s age, background and interests. Whether you’re planning hands-on activities, hosting a guest speaker, or encouraging informal conversations, your energy and curiosity will set the tone.
A few tips for getting started:
- – Test it out. Try the activities yourself first so you see how they flow, have examples to share, and get a sense of how much time folks might need.
- – Keep it playful. Math comes alive through movement, storytelling, creativity and shared experiences.
- – Celebrate questions. Wondering “why?” or “what if?” is exactly the point.
- – Be flexible. You don’t need to follow every step or complete every activity; go where the energy leads!
- – Highlight real voices. Invite speakers or volunteers to share how math appears in their work or daily lives, and make room for diverse perspectives.
- – Engage, don’t perform. Focus on participation and discovery, not on being right or mastering content.
- – Stay curious. You don’t need all the answers. Explore and learn together.
- – Take your time. If one idea sparks joy or deep interest, stay with it. That’s meaningful learning.
- – Use pi as a doorway. It’s okay if people leave with more questions than answers.
Above all, make it your own!
Activity 1: Pi & Pattern Poetry (π-ku)
Exploration Goal:
Participants will explore how the digits of pi can be turned into patterns of words and rhythms. Invite participants to create poems in any language and watch them discover that math has rhythm, beauty and room for creativity, no equations required.
Overview:
Infinite sums stretch on forever, like the digits of pi or the rhythm in a poem. Poets and mathematicians alike have been fascinated by infinity, rhythm and hidden patterns. In this activity, participants will write short poems called pi-kus. These poems follow the form of a haiku, but instead of the 5-7-5 haiku pattern, the syllables in a pi-ku follow the number of digits in pi (3-1-4…). Perfect for libraries, writing groups and curious minds of all kinds, it’s especially welcoming for anyone who’s ever said, “I’m not a math person.” Invite poems in any language and watch participants discover that math has rhythm, beauty and room for creativity, no equations required.

Math Concepts:
pattern recognition, symbolic reasoning, sequencing and irrational numbers
Time:
20-35 minutes
Materials:
Prepare Ahead:
- – Optional: print examples of pi-ku poems (page 9)
- – Optional: print word bank to provide to younger children (page 11)
What You’ll Need:
- – Paper or journals
- – Pens, markers or pencils
- – Optional: large display board or string with clips for sharing poems
Instructions (Step-by-Step):
1. Introduce pi in context. “Today we’re going to play with math and poetry together: we will use the number pi as inspiration to write tiny poems.” Share that pi (3.14159…) has infinitely many decimal digits that do not repeat and are found everywhere circles exist. Share a fun fact: Pi has been calculated to more than 300 trillion decimal digits, and it never repeats. You can also show a visual of pi’s digits or display them in a circle to awaken curiosity!
2. Share the pi-ku form. “We’ll use the digits of pi as a pattern for our poems. The first line will have three syllables, second line one syllable, and third line four syllables. That’s a pi-ku!” Continue with one, five, nine syllables if desired, or keep it simple with three lines! Make sure to emphasize that each line corresponds to the digits of pi.
– Round and round
– One
– Endless circle
This helps participants see how math can transform into language!
3. Facilitate writing time. Give participants 15–20 minutes to write and consider offering optional templates or visual aids for inspiration. Encourage experimentation and collaboration; participants can write multiple pi-kus or collaborate in pairs!
4. Offer writing prompts:
– What do circles remind you of?
– Where do you see pi in daily life?
– How does infinity feel?
– If pi were a person, what would it say?
– Describe a world made of spirals or loops.
Encourage freedom: “Your pi-ku can be serious, funny or even nonsense. All are welcome!”
5. Share and display. Invite participants to read their pi-kus aloud or create a gallery wall where poems can be displayed. Celebrate unusual or playful interpretations! “Notice how everyone started with the same pattern, but each poem is unique, just like pi’s digits.”
6. Extend! Create a group “chain pi-ku,” where each person adds one line using the next digit of pi. Pair poems with simple illustrations of circles, spirals or other pi-related imagery.
Community Adaptations
Translate the “pi-ku” form into different languages or scripts.
Getting Younger Children Involved
- – Instead of forming their pi-ku with 3-1-4 syllables, use 3-1-4 words.
- – Provide word banks (e.g., circle, spin, round, endless, etc.).
- – Let them draw pi-themed illustrations around their poems.
Have a “pi-ku open mic” where people read their poems.
Getting Teens and Adults Involved
- – Challenge them to extend the sequence further (1, 5, 9, …).
- – Experiment with collaborative group poems.
- – Invite humor or pop culture references in their pi-kus.
- – Explore translations of pi-ku into other languages or poetic traditions.

Activity 2: Discovering Pi
Exploaration Goal:
Participants will experience how pi emerges from the timeless relationship between a circle’s circumference and diameter. Through measuring real circular objects, they’ll experience firsthand that it always takes a little more than three diameters to go around any circle — a discovery shared by ancient civilizations thousands of years ago.
Overview:
Today we know pi is 3.14159… but thousands of years ago, without calculators or computers, ancient civilizations in Babylonia, Egypt, China and elsewhere found clever ways to approximate it. Builders and astronomers alike relied on this special number, which links circles of all sizes. Throughout history, people across civilizations have been fascinated by the relationship between a circle’s circumference and its diameter. This ratio, now called pi, is constant for all circles, no matter their size.
In this activity, participants will reenact that process by rolling circular objects along a line and comparing diameters to circumferences. Just as people long ago noticed, they’ll see it always takes about three — and a little bit more. This simple, hands-on experiment turns an abstract constant into something visible, tangible and fun, while sparking curiosity about the history and wonder of pi.

Math Concepts:
circumference and diameter, ratio and proportionality, measurement and approximation
Time:
15–20 minutes
Materials:
Prepare Ahead:
- – Collect circular objects (e.g., plates, cans, poster tubes, paper towel tube, rolls of tape, bottle caps, etc.).
- – Draw a long straight line on paper (at least four times longer than your biggest circular objects’ diameter). We’ve included a printable version. (page 17)
What You’ll Need:
- – Pens, pencils or markers for making marks on the paper and the circular objects
- – Ruler
- – Optional: small stickers or tape for marking circular objects
Instructions (Step-by-Step):
1. Set up the rolling line(s). We will use these to measure and mark the circumference of your circular objects. Use the printed template line on letter paper for small objects, or a drawn line on a larger surface (paper sheet or floor) for bigger objects. This will be the track for rolling circles.
– For a group of many participants, each participant could be handed a printed line template after you introduce the activity. Each participant should also be handed a pen/pencil/marker to mark the circumference and diameters of their object on the line.
– Choose a circular object to demonstrate with.
2. Introducing the activity. “How did mathematicians figure out the mathematical constant pi thousands of years ago? Today, we’re going to discover pi ourselves!”
3. Mark a starting point. Place a sticker, tape or marker on the edge of your circular object. Show participants how to make a small mark on the rim of the object as a starting point.
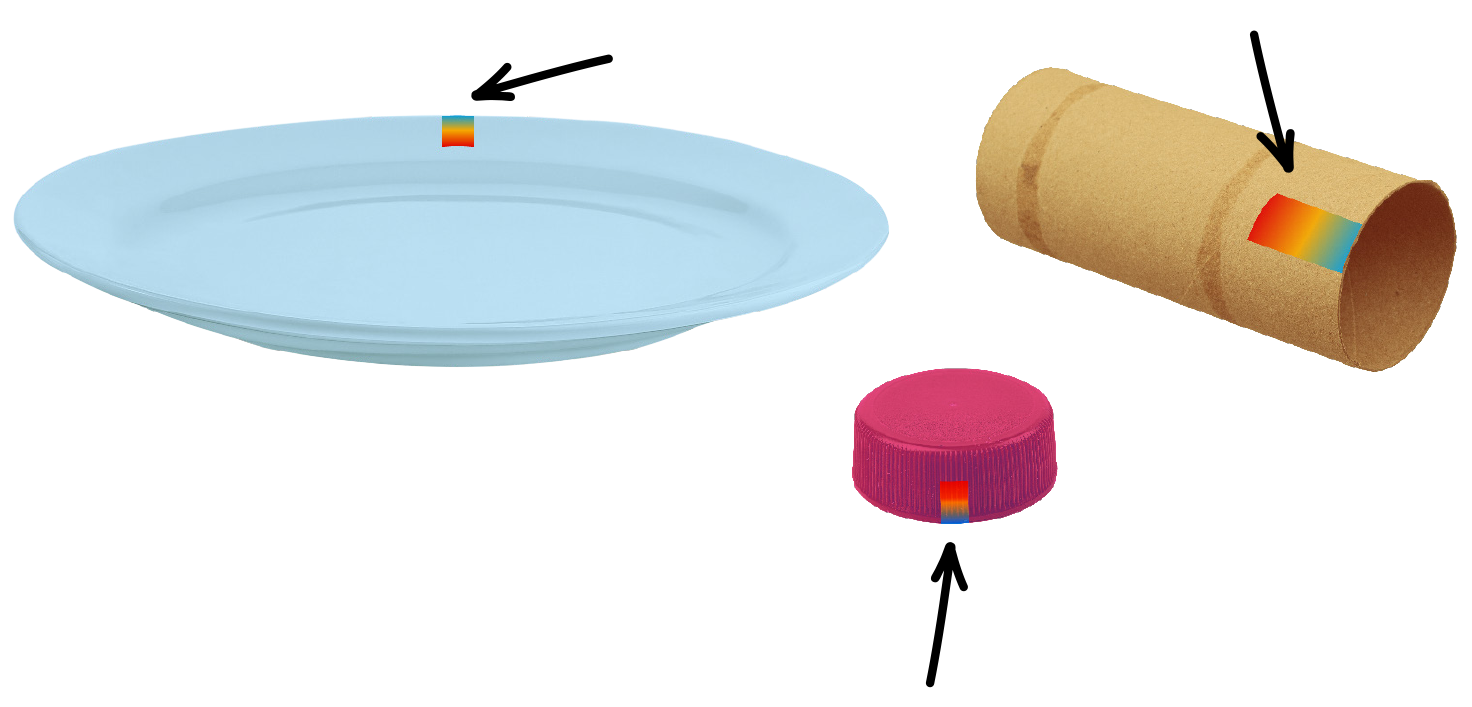
4. Roll one full revolution. Place the circular object on the line so that the edge of its rim touches the line, lining up the starting mark on your object with the line. Slowly roll the object along the line until the marked point touches the line again. Mark this spot – this is the circumference!
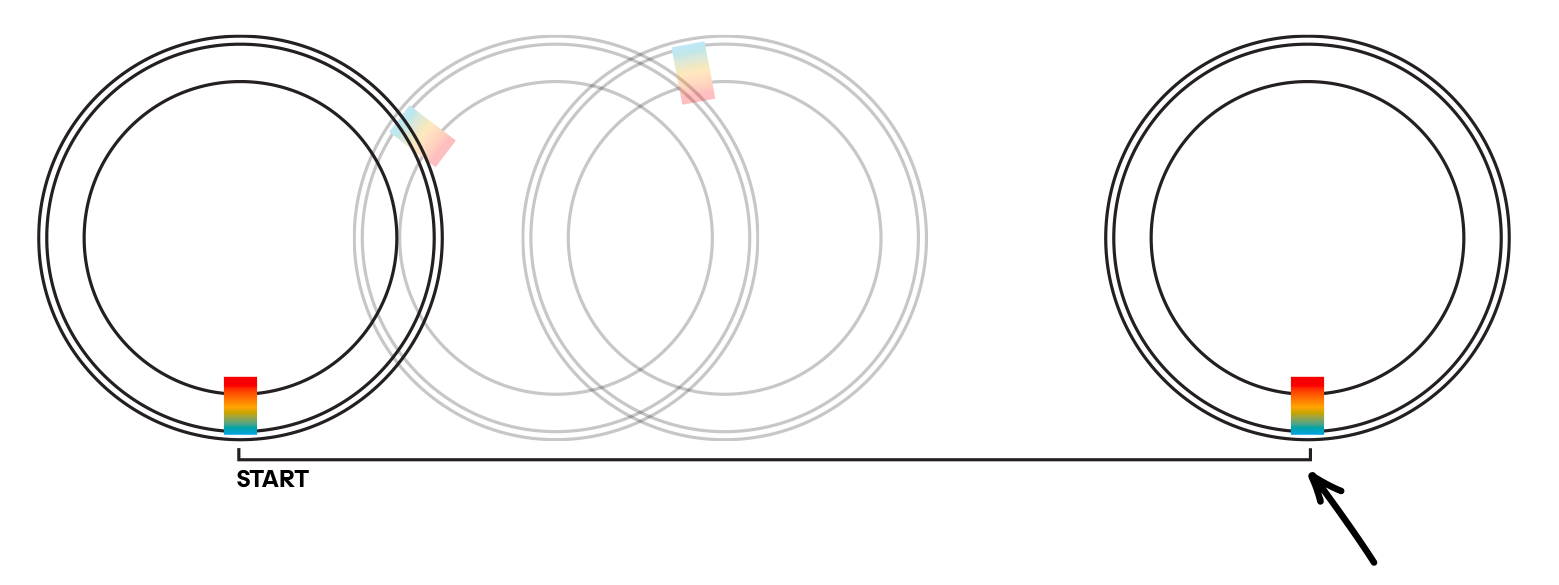
5. Measure the diameter. Now lay the object flat on the line with its rim touching it. Mark the length of one diameter and repeat along the line. Count how many diameters fit into the circumference distance. Notice how the circumference is always a little more than three diameters!

6. Repeat and explore. Invite participants to try with different circles — tiny bottle caps, medium jar lids, paper plates, etc. Highlight how it always works, no matter the size!
7. Discuss and wonder. “Why do you think so many civilizations cared about this number? Where do you see circles and pi used in the world today?
Community Adaptations
Go big! Use a craft paper roll on the flooror draw a long chalk line outdoors.Try using large objects such as a hula hoop or a bucket.
Getting Younger Children Involved
– For young kids, focus on the fun of rolling and exploring the constant relationship between how far the object rolls and its width.
– Encourage observation. “Does a bigger circle take more rolls?”
Compare tiny objects (bottle caps, paper towel rolls) with large objects (hula hoops). Watch the “three and a little more rule” scale up and down!
Getting Teens Involved
– Add an experimental challenge: who can come closest to 3.14159… with their measurements? (π = circumference ÷ diameter). Encourage measuring circumference and diameters on the line with rulers and see how close their calculated pi approximation is to theoretical pi.
– Emphasize the ideas of precision (“Are your repeated rolls giving similar/consistent results?”) and accuracy (“How close are your results to the actual ratio (pi = 3.14159…)?”).
– Encourage them to test whether larger or smaller objects give more accurate results.
Print multiple paper templates and provide multiple circular objects so several people can try the rolling experiment side by side.
Getting Adults Involved
– Invite reflection on how ancient and modern cultures used pi in practical, scientific, artistic and inspirational ways, and what makes this constant so universally fascinating.
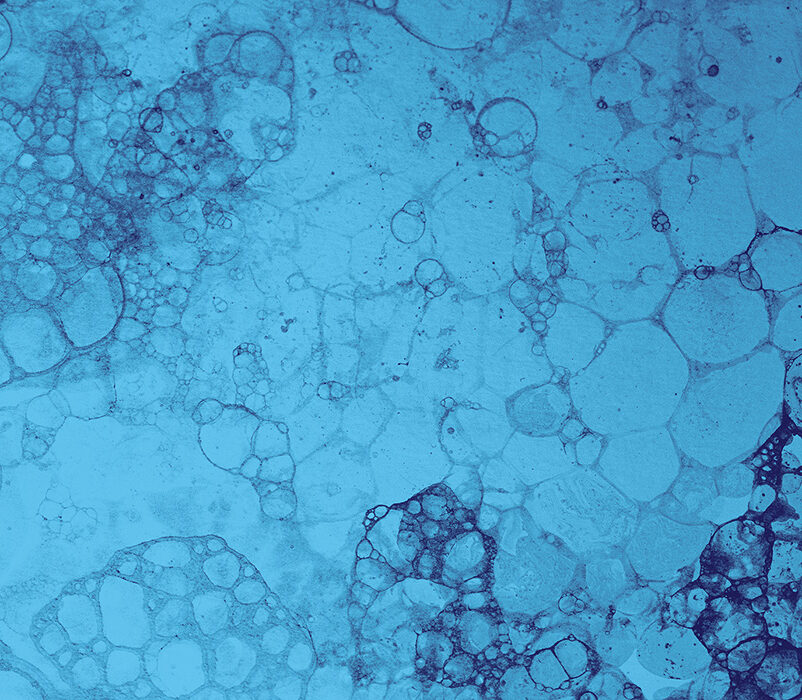
Activity 3: Bubble Geometry
Exploration Goal:
Participants will explore how bubbles reveal math in motion. They will observe how bubbles naturally form perfect spheres, leave circular prints, and meet at 120 degree angles. Through hands-on play and observation, participants will discover how nature balances beauty and efficiency in the simplest of shapes.
Overview:
Bubbles aren’t just fun, they are math you can see and touch! Every free-floating bubble always naturally forms a sphere — the most mathematically efficient shape for enclosing space. Whenever we describe the size of a sphere, pi is part of the equation. From the curve of a bubble to the geometry of planets, pi helps us make sense of round shapes across nature. And when a bubble pops, it leaves a circle, a 2D “shadow” of the sphere, showing how shapes in different dimensions are connected.
As an extra exploration, when two or more bubbles meet, their soap films always join at angles of about 120 degrees — forming patterns that look playful but are guided by geometry — just like honeycombs, foam and other natural structures. They are a perfect demonstration of how nature “chooses” mathematically efficient structures. This activity turns play into mathematical discovery and sparks wonder about pi, geometry and the hidden math in the world around us.

Math Concepts:
geometry of spheres and circles, surface area efficiency (minimal surfaces), ratio of circumference to diameter, measurement and estimation, circle geometry in physical systems, angles formed by bubble junctions, patterns in natural structures, real-world math through playful experimentation
Time:
15–25 minutes
Materials:
Prepare Ahead:
– Containers for making bubble solution (holds at least one cup of liquid) (one per color).
– For each cup of bubble solution:
– 1 cup warm water
– 2 tbsp liquid dish soap (Joy or blue Dawn dish soap works best)
– 1 tbsp granulated sugar (for stronger bubbles)
– 1 tbsp tempera paint or 5 drops food coloring (in your colors of choice)
– Spoons for mixing
– Print protractor template below on a U.S. letter-sized transparency sheet or thin paper (page 23)
What You’ll Need:
– Bubble wands or straws (ideally enough for one per participant)
– White paper
– Protractor or printed protractors
Instructions (Step-by-Step):
1. Prepare the bubble mix. In your designated container, mix 1 cup warm water, 2 tbsp dish soap, 1 tbsp a small amount of sugar (this helps bubbles last longer), and your colorant of choice. Stir gently with the spoon to avoid foam.
2. Set up your workspace for safe bubble blowing. Cover your table or demonstration area with white paper for making bubble prints. Demonstrate how to dip one end of the straw gently into the bubble mix, then blow slowly and steadily to form a bubble.
– Safety tip: Remind participants to blow gently through the straw, don’t suck up the liquid!
3. Watch the spheres. Blow bubbles through the straw or bubble wand. Notice how each bubble in the air forms a 3D sphere. “Why do you think bubbles always turn into balls instead of cubes or triangles?”
– A soap bubble is simply a very thin sheet of soapy water, called a soap film, surrounding a volume of air.
– Bubbles always form spheres (a ball shape) because a sphere encloses the most space with the least surface area. Nature likes efficiency!
4. Make bubble prints. Let the bubble land and pop on the paper — that will make a “bubble print.” “What shape do you see left on the paper?”
– Tip: If the bubbles are blowing away, you can encourage participants to blow them just above the paper.
5. Explore the 3D-2D connection. “When the bubbles pop, what shape do you see left on the paper?”
– When the bubbles pop, they leave behind nearly perfect circular marks. This mark it leaves behind is a circular 2D “shadow” of the 3D sphere. This shows the connection between 3D and 2D; the sphere’s roundness translates into the circle’s roundness!
6. Optional: Explore bubble angles. Blow two or more bubbles so they touch in the air and let them pop on paper, observing how they connect.
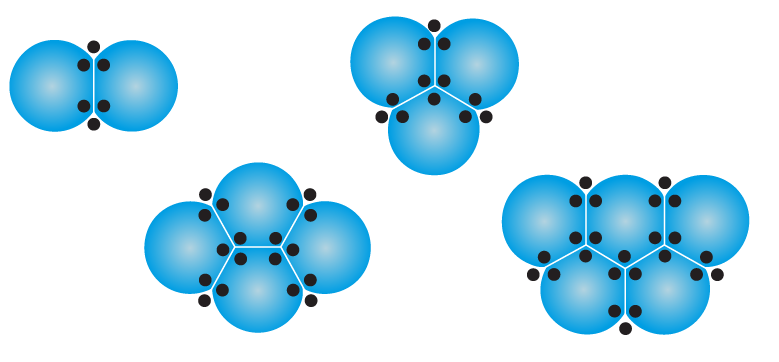
– “What do you notice about the angles where the bubbles meet?” Whenever two or more bubbles meet, the lines where they join always meet at an angle of about 120 degrees.
– “Why do bubbles meet at 120 degrees?” Because it minimizes the total surface area. Imagine three soap films meeting — if the angles were smaller or larger, the bubble surfaces would stretch more, using more soap and energy. 120 degrees is the perfect balance: each film shares space equally and stays as short as possible. Nature uses this principle to save energy and material — that’s why bubbles, honeycombs and some crystals all do this!
– Connect to other examples and discuss. “Can you think ofother examples in nature or in everyday life where things connect this way?”
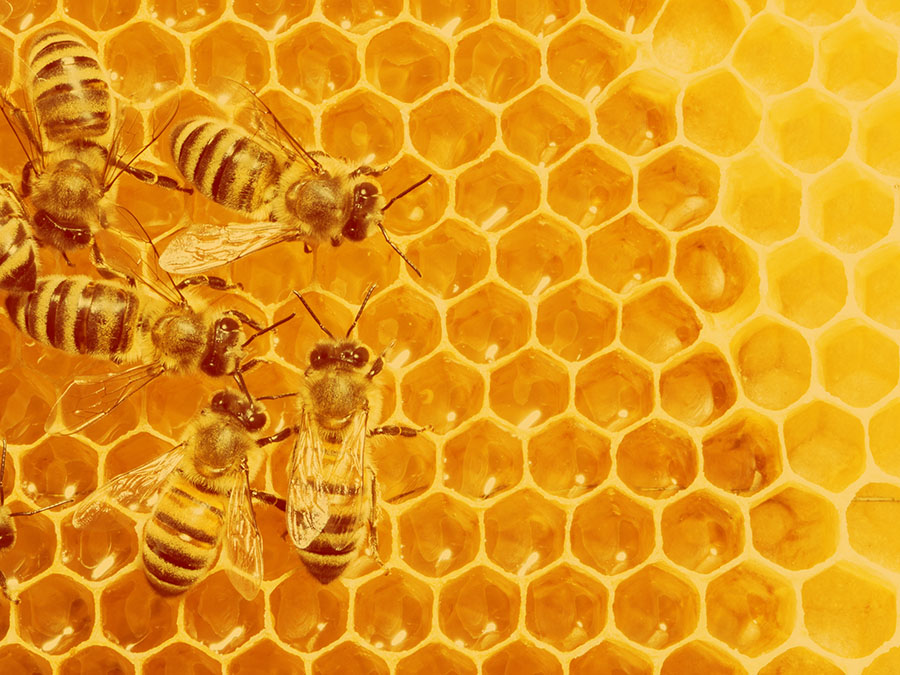
The way bubbles connect is the same as how bees build honeycombs! In both cases, the lines where things meet form 120-degree angles. This makes hexagon patterns, which are the most efficient way to connect cells while using the least material. For bees, this means they don’t waste wax — just enough to hold the honey.
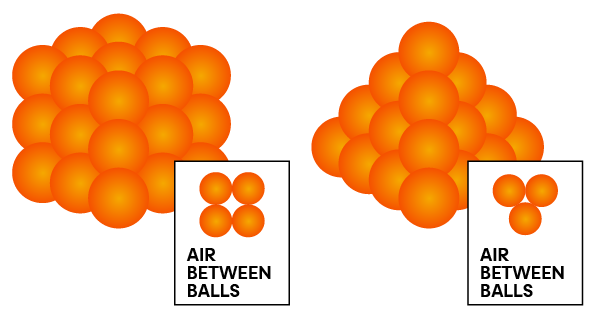
Another example is stacking objects —stacking oranges in a crate or laying tiles in a floor often use hexagons to fit tightly!
Community Adaptations
Make a bubble banner! Roll out a long sheet of craft paper and invite participants to add their own colorful bubble prints and sign their names beside them. As the banner fills, it transforms into a vibrant mural that blends math, art and play. Once complete, hang it in a visible spot so everyone can enjoy the collaborative creation. You might even want to write the digits of pi across your artwork — the longer your banner, the more digits of pi you can include.
Getting Younger Children Involved
– For young kids, focus on the fun of bubbles! Let them blow bubbles, make prints, and watch circles appear.
– Encourage kids to notice the shapes and angles when bubbles meet (Y-shaped connections) without needing numbers.
Getting Teens Involved
– Teens can also experiment with different bubble sizes and arrangements to see how patterns change.
Getting Adults Involved
– Discuss how soap films, bubbles and honeycombs illustrate efficiency and optimization in nature. For example, spheres enclose the most volume with the least surface area (raindrops, bubbles, planets). Cells are roughly spherical to save space and energy while enclosing fluid or nutrients.
– Adults can focus on connections to nature, design and efficiency. For example, observing how nature optimizes shapes helps engineers and designers save materials, energy and space! Geodesic domes use triangles or hexagons to enclose space efficiently. Packaging design: hexagonal honeycomb panels are lightweight but strong. Foams and bubble-like structures inspire lightweight materials and aerodynamics.
Activity 4: Pi Toss (Buffon’s Needle)
Exploration Goal:
Participants will explore how pi can appear in surprising ways through chance and play. By tossing toothpicks onto lined paper and observing which ones cross a line, they’ll see patterns emerge from repeated trials. Through hands-on experimentation and observation, participants will discover that even randomness can reveal predictable and universal mathematical truths.
Overview:
Math sometimes appears in the most unexpected ways — emerging from chance and randomness. In this activity, participants toss toothpicks onto paper with evenly spaced parallel lines and watch which ones cross a line. Over many tosses, patterns emerge, and the ratio of crossings approaches the value of pi.
This classic experiment is known as Buffon’s Needle Problem, named after French mathematician Georges- Louis Leclerc Comte de Buffon, who first published it in the 18th century. It’s a beautiful demonstration that randomness and geometry work together to reveal deeper mathematical truths. Participants will experience firsthand that repeated trials and careful observation can turn seemingly random events into predictable mathematical patterns. Through repeated trials, participants discover that as the number of tosses grows, the result gets closer to pi. This playful, hands-on activity turns an abstract number into something visible, tangible and fun, while sparking curiosity about probability, geometry and the surprising ways math shows up in the world.

Math Concepts:
experimental and geometric probability, ratios and approximation, connection between geometry
and randomness
Time:
30–60 minutes (or longer for more tosses)
Materials:
Prepare Ahead:
– Large sheet of paper or poster board with evenly spaced parallel lines (see instruction step 1)
What You’ll Need:
– Ruler
– Pencil
– Toothpicks (or matches; other types of small sticks that have all the same length)
Watch out! Create a safe tossing space, especially if working with younger participants. Toothpicks should be thrown gently and never toward others.
Instructions (Step-by-Step):
1. Prepare the bubble mix. In your designated container, mix 1 cup warm water, 2 tbsp dish soap, 1 tbsp a small amount of sugar (this helps bubbles last longer), and your colorant of choice. Stir gently with the spoon to avoid foam.
2. Prepare the tossing surface. Draw several parallel lines (at least five) on your paper, evenly spaced apart. The distance between the lines should be exactly twice the length of a toothpick (or whatever thin sticks your group will be tossing). This setup is essential for the probability to work out. Use a ruler to ensure accuracy.
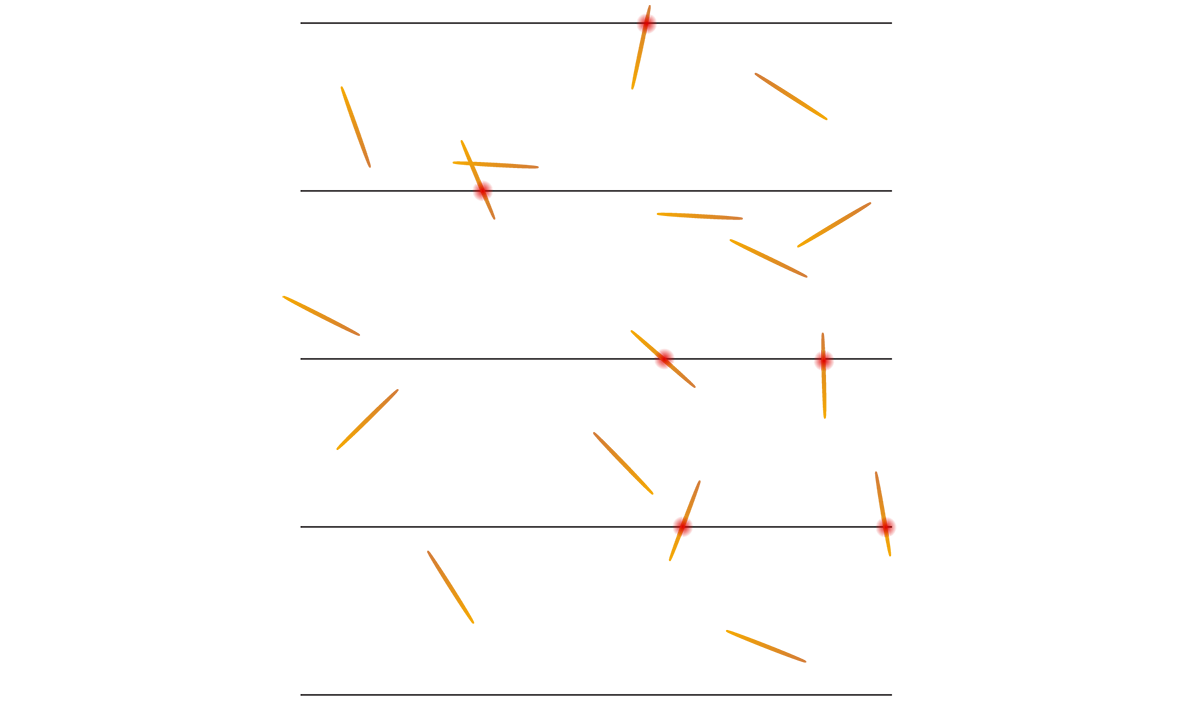
2. Toss the toothpicks. “We’re going to throw sticks and see how often they land on a line. The number pi will come out of our game!” Hand out toothpicks and let participants toss them one at a time onto the paper. Encourage truly random throws, no aiming allowed! Aim for at least 30 tosses (either 30 participants toss one toothpick each or allow participants to toss multiple). The more total tosses, the more accurate the approximation will be.
3. Count and record. After tossing, count the total number of toothpicks tossed. Then count how many of them cross or touch a line. Remind participants not to count any toothpicks that land off the paper or hang off the edge.
– Facilitator tip: Choose one volunteer to count total tosses and one volunteer to count crossings so numbers don’t get mixed up. Alternatively, split the paper into sections and assign small groups to count in their section, then combine totals.
4. Calculate pi. Use the formula:

– Example: 30 tosses, 10 crosses → π ≈ 30 ÷ 10 = 3.
– “What number did we get?” The result should hover near 3, and with more tosses, it gets closer to 3.14.
5. Increase your number of trials. Invite participants to throw more toothpicks, count, and re-calculate pi by repeating steps 2 through 4. Notice how the group’s estimate of pi gets closer to the actual value of pi with more tosses.
6. Reflect and compare. Compare the group’s result to the actual value of pi. For many participants, this is an “aha” moment, seeing pi emerge from pure chance.
– “How can tossing sticks tell us something about pi?” Whether a stick crosses a line depends on its angle and where it lands. Angles are part of a circle, so the geometry of a circle naturally comes into the probability. When you do the math, the formula for the probability of crossing lines involves pi.
– Highlight how randomness, when repeated enough, converges on a universal constant. “Why does it get closer to pi with more tosses?” Randomness evens out when repeated many times (law of large numbers).
Community Adaptations
Try this experiment outdoors! Use chalk or painter’s tape to draw wide parallel lines on pavement. Replace toothpicks with popsicle sticks, chopsticks, or even pencils for a larger, visible version. Lines must be twice as far apart as the length of the stick. (Example: if pencils are 6 inches long, space lines 14 inches apart.)
Getting Younger Children Involved
– Focus on counting and seeing which sticks touch lines.
– Orient exploration goal toward spinning and turning to learn about angles. Have participants try: 1) making one big spin all the way around 2) making a half turn to face the other way 3) turn just a tiny bit. “That’s all an angle is — a way to measure turning. Every turn fits on a circle. If you keep turning, you’ll go all the way around once — that’s a circle!”
Getting Teens Involved
– You can also talk about why randomness converges to a predictable result, where more trials = more accuracy (law of large numbers). The law of large numbers says that the average result of many repeated random experiments gets closer to the true probability.
Getting Adults Involved
– With adults, lean into the mathematical beauty of the experiment. Talk about how this activity bridges probability and geometry, and how pi arises from such a surprising context.
Activity 5: Circular Weavings Inspired by Pi
Exploration Goal:
Participants will use a paper plate weaving loom to create colorful rings and see pi in action. Each new ring grows in proportion to the ring’s diameter, turning the abstract ratio of circumference to diameter into a visible pattern. This activity encourages participants to explore the connection between math and art while experimenting with color, repetition and growth.
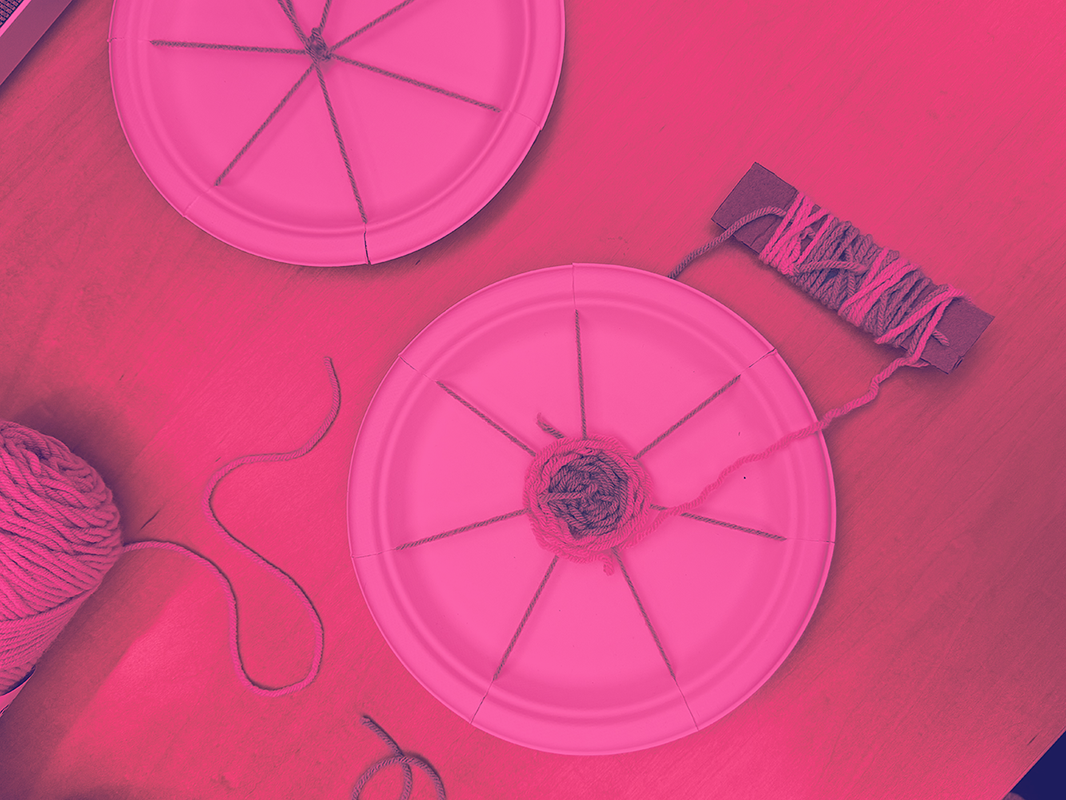
Overview
Infinite sums come alive in the loops and rings of weaving, where each row builds on the last. Using a simple paper plate loom, participants physically experience how repeating patterns grow and relate through the ratio of circumference to diameter — pi itself. Weaving connects math to sensory creativity, showing how repetition of processes can build up to tangible beauty.
Math Concepts:
ratio of circumference to diameter, circular geometry, measurement and estimation, patterns and repetition
Time:
20–45 minutes
Materials:
Prepare Ahead:
– Yarn shuttles made of large craft sticks or popsicle sticks and yarn (see step 1 for instructions)
– Paper plate weaving looms (see steps 2–4 for instructions)
– A few copies of the Circular Weavings Inspired by Pi printouts (Find printouts here.)
– Completed paper plate weaving to show as an example
What You’ll Need:
– Bundles of yarn in various colors or scrap yarn that can be tied together
– Paper plates
– Pencils
– Scissors
– Calculators
– Ruler to measure and draw straight lines
– Optional: beads or decorative materials for embellishment
– Optional: printed strips showing the digits of pi for inspiration
Watch out! Adult supervision is required if young children are using scissors.
Instructions (Step-by-Step):
1. Prepare the yarn shuttles. These can either be prepared and passed out, or older participants may prepare these as a group. Cut yarn into 36–48 inch lengths. Wrap the yarn around a craft stick to prevent tangling (this becomes the shuttle). Optional: Tie shorter scraps together to create a longer, colorful strand.
2. Prepare the paper plate. These can either be prepared and passed out, or older participants may prepare these as a group. On the back, use a pencil and ruler to divide the plate into an odd number of sections (7–9 sections for younger kids, 9+ for older). Draw straight lines across the back of the plate to mark the sections.

3. Cut slits into the top of each section. Cut 1–1.5 inch slits along the drawn lines at the edge of the plate, leaving the space in the center of the plate intact. These slits will hold the spokes of your paper plate weaving loom.
4. Turn the paper plate into a weaving loom. Next, demonstrate how to wrap yarn through opposite slits, tying securely on the back. Continue until each slit has a yarn “spoke,” like a bicycle wheel. Tie the final piece at the center, pulling the yarn threads snug. This will keep the yarn loom in place. Trim or tuck the tails.

5. Use a yarn shuttle to start weaving from the center. Tie the yarn shuttle to the center of the loom. Demonstrate how to weave over-under around the spokes, working outward in rings.
6. Introduce pi in context. Share that pi (approximately 3.14) is the ratio of a circle’s circumference to its diameter. Explain that “If you measure around a circle of yarn and then divide that number by the distance across that same circle of yarn, you always get pi!” Invite participants to imagine their weaving as a physical model of this relationship.
7. Add in more colors and patterns. Encourage participants to switch shuttles every few rings to build colorful layers. Challenge teens and adults to create a “pi-coded” weaving by assigning different colors to the digits of pi (e.g., 3 rings = blue, 1 = red, 4 = yellow, and so on).
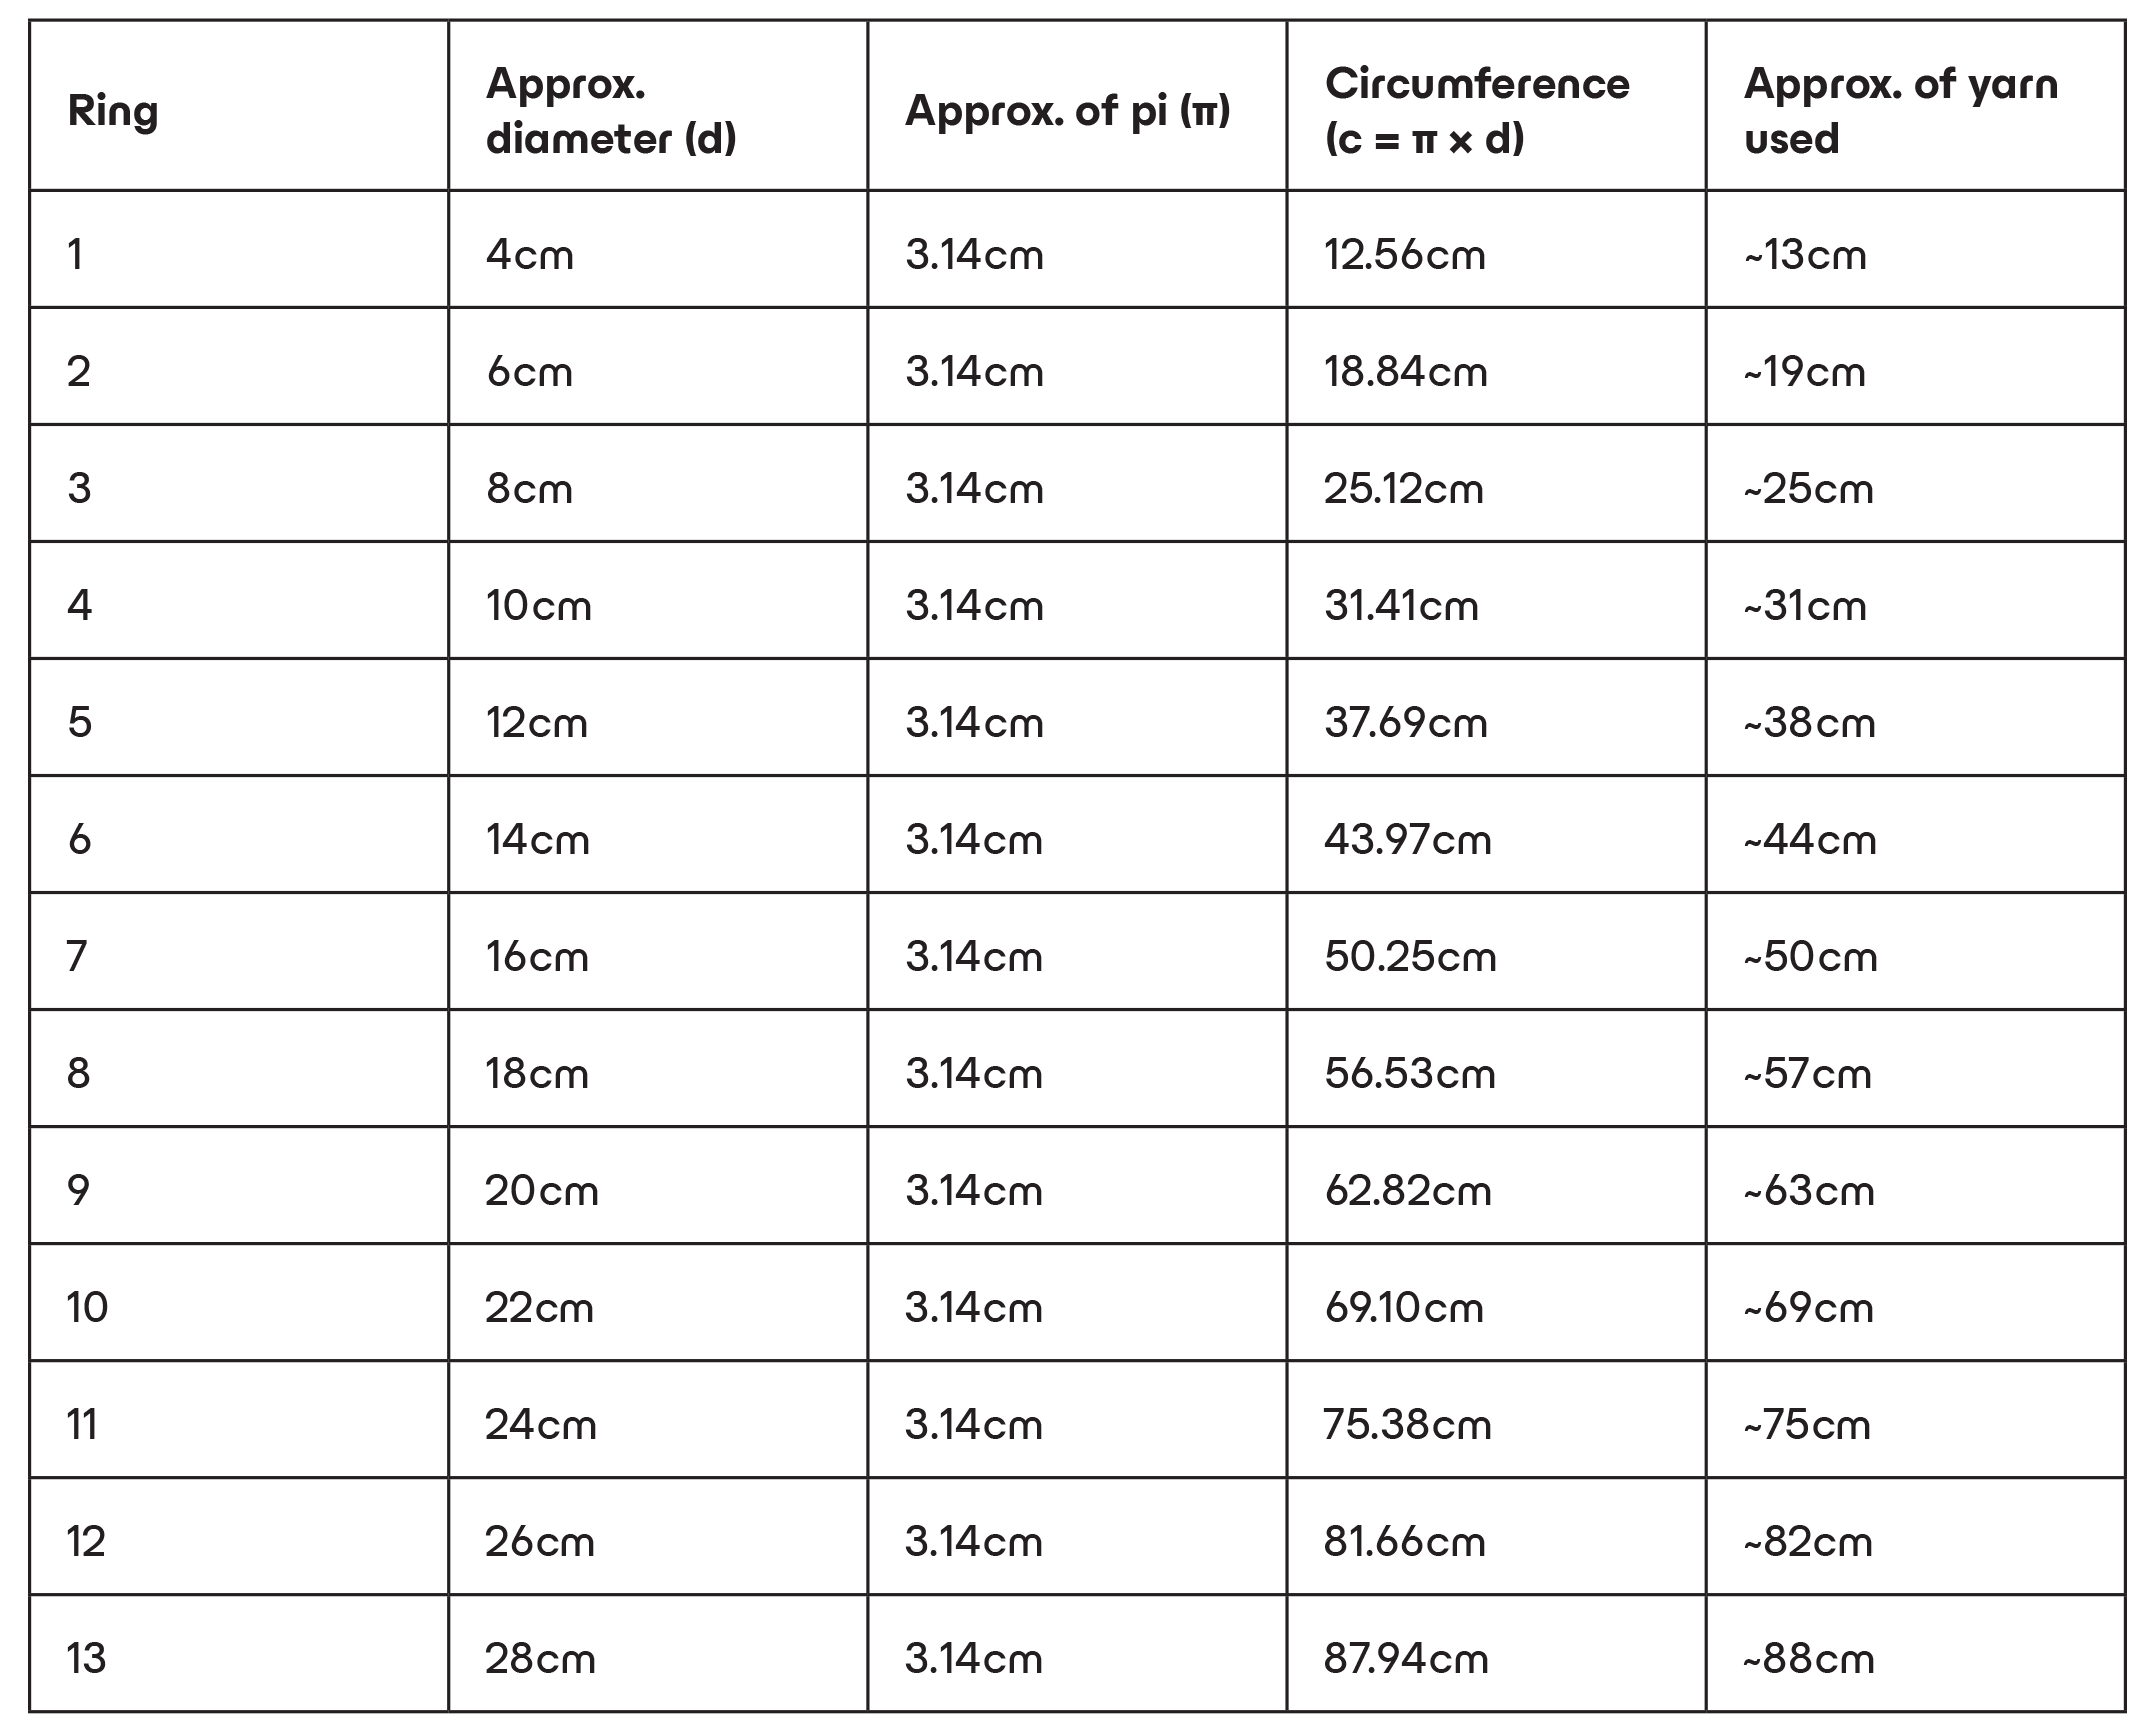
8. Connect weaving to pi. Once participants have a few rings on their loom, pause and have them measure the yarn length, in centimeters, used for one full ring — the ring’s circumference. Ask them to compare their measurements with the formula: circumference = π × diameter. Point out: “Each bigger ring takes more yarn, and pi can help us figure out how much more!” In other words, the growing length of yarn needed for each new ring reflects pi’s ratio of circumference to diameter, turning an abstract formula into something they can see and measure in their weaving.
9. Compare their results. After participants have measured the yarn for a few of their rings, have them compare their results with the table included on the Circular Weavings Inspired by pi printout. Point out that while each ring’s diameter grows steadily, the amount of yarn needed increases according to pi. Encourage them to see how closely their yarn lengths match the calculated circumferences — a perfect “aha!” moment, where pi comes to life in their weaving.
10. Finish and display! When participants reach the plate’s edge, tie off the yarn neatly. Display the finished weavings together in a “Pi Gallery” to celebrate the math behind the art.
Community Adaptations
Use recycled or natural materials for eco- friendly weaving.
Getting Younger Children Involved
– Prepare the yarn shuttles and paper plate weaving looms in advance so kids can jump straight into weaving.
– Let them use one or two colors instead of measuring.
– Turn weaving into a counting activity, count the rings or spokes together.
– Emphasize that “each new ring is bigger because circles always grow in the same way, thanks to pi!”
Invite local artisans to demonstrate traditional circular weaving techniques.
Getting Teens Involved
– Have teens measure, cut and string their own yarn shuttles and paper plate weaving looms to practice symmetry and spacing.
– Challenge them to follow pi’s digits with yarn colors (3 = blue, 1 = red, 4 = yellow).
– Ask them to measure each ring’s circumference and compare it to pi multiplied by diameter.
Display finished weavings in community spaces with explanations of the math involved.
For the adults
– Have them measure, cut and string their own yarn shuttles and paper plate weaving looms to practice symmetry and spacing.
– Invite them to share their own stories of circular weaving traditions (e.g., basket weaving or dream catchers).
Measuring the Rings: Yarn Length and Pi in Action
HOW TO READ THIS TABLE:
– Don’t forget, the ring’s circumference is equal to the measurement of the ring’s diameter multiplied by pi.
– The “approx. of yarn used” column gives the closest estimate to what participants are likely to observe when measuring their rings.
– The “circumference” column shows the exact length of yarn used to make the ring.